Plugin: Authorize.net Payment
We no longer support this payment method.
If you have previously set up Authorize.net as a payment method, please contact hello@reiconversion.com for support.
In this section of the documentation, we're going to discuss how to set up payments for properties on your website.
Heartland Payments
Firstly, you will need to create an account with Heartland Payments Systems. Heartland is the only credit card processing system that is allowed to process transactions for the sale of land.
Apply here for your Heartland Payments Systems.
Authorize.net
After your Heartland account has been approved, Heartland will help assist in creating an Authorize.net account for you to take credit card payments for land.
NOTE: It is not required that you need an Authorize.net account created by Heartland to take payments from your client's credit cards.
You can also open your own authorize.net here.
Setting Up Your Authorize.net Account
Head over to authorize.net.
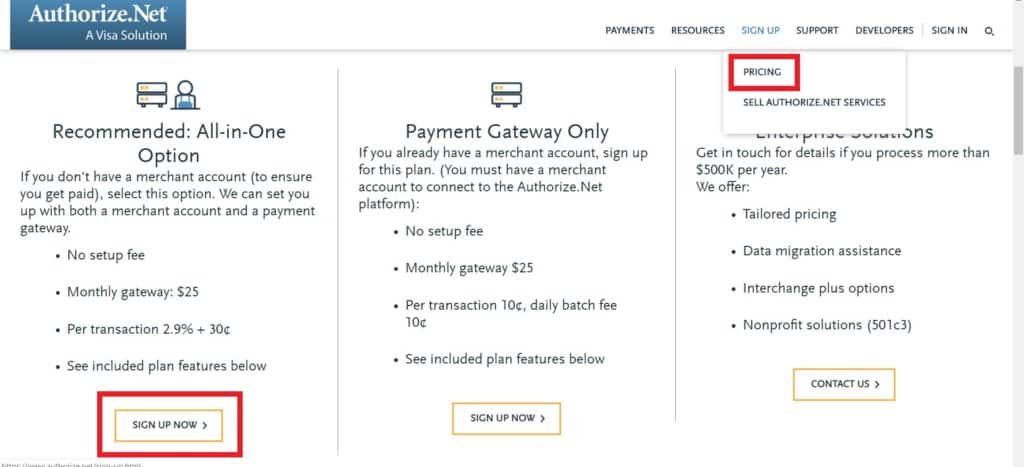
Click on Sign Up then Pricing at the top of the page.
You'll then be directed to the following page. Select the plan that suits you best and click Sign Up Now.
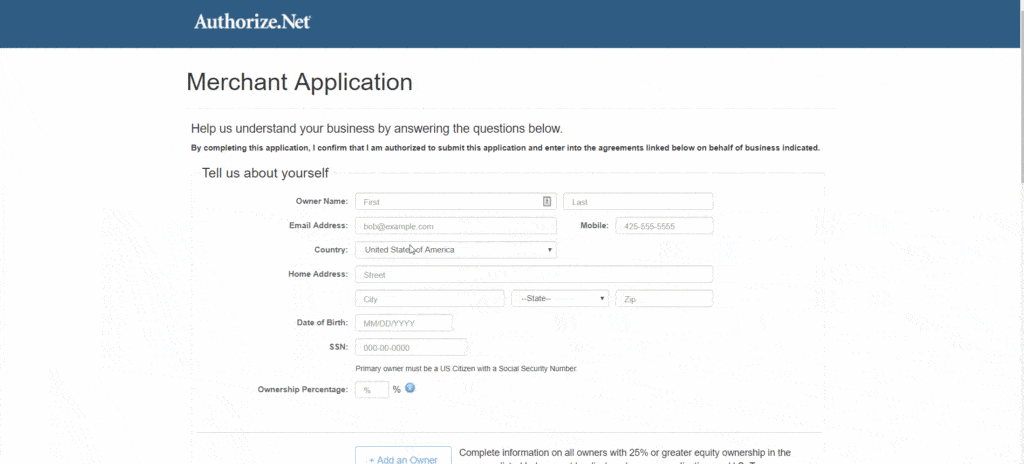
You will then need to fill out all your personal and payment information and details about your business.
Once you're finished, you'll need to check the boxes at the bottom of the page, then click I Agree to register.
Authorize.net Account Security Settings
Before we head back to your site we need to make sure settings are correctly set inside of Authorize.net
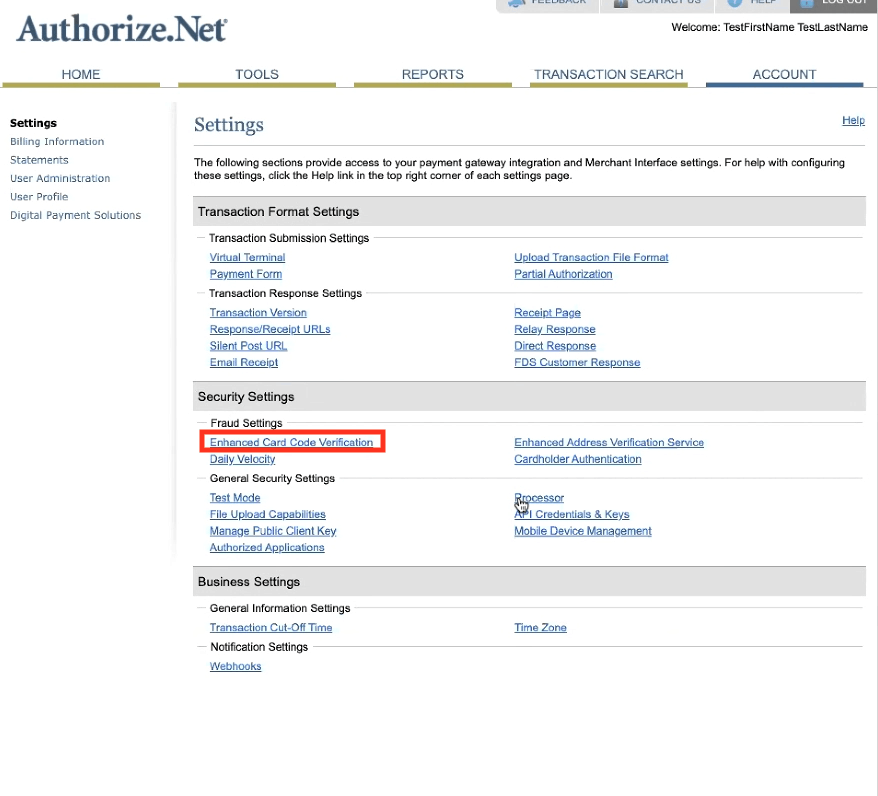
Inside of your Authorize.net account, head go to Account > Security Settings > Enhanced Card Code Verification
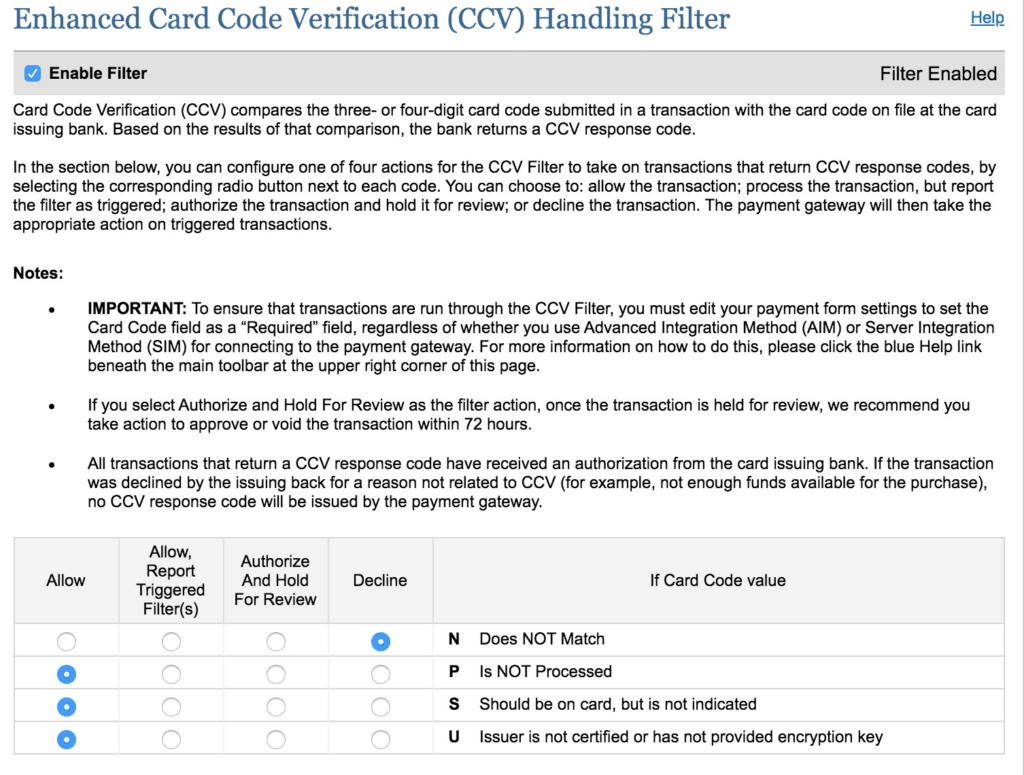
Please make sure these radio boxes are marked exactly:
Then go back to your Authorize.net account settings > Security Settings > Enhanced Address Verification Service
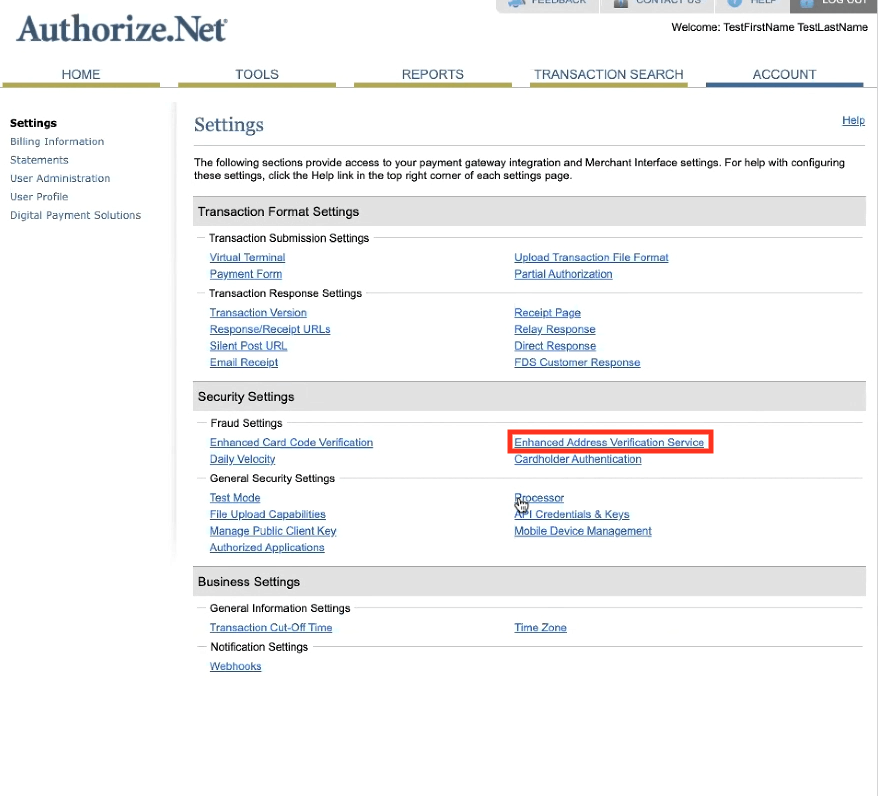
Please make sure these radio boxes are marked exactly:
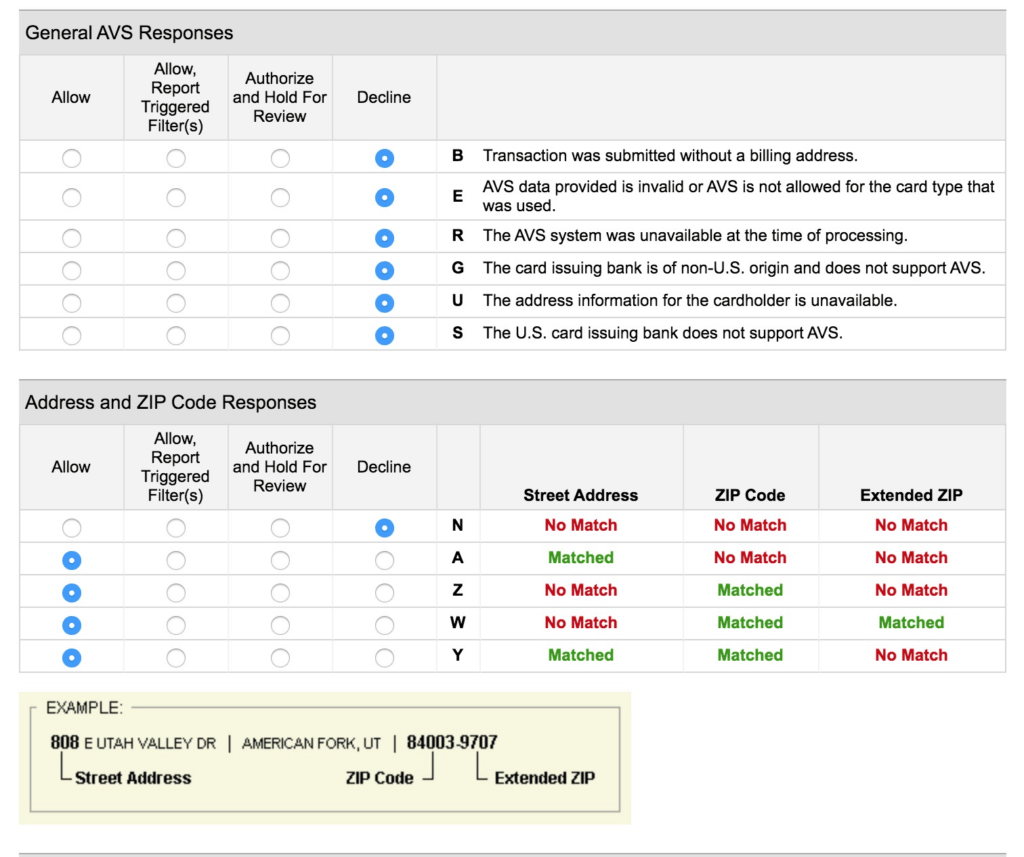
Your security settings for taking in card payments has now been set.
Entering the API Information
Next up you need to enter Authorize.net's API information so the system will work correctly on your site.
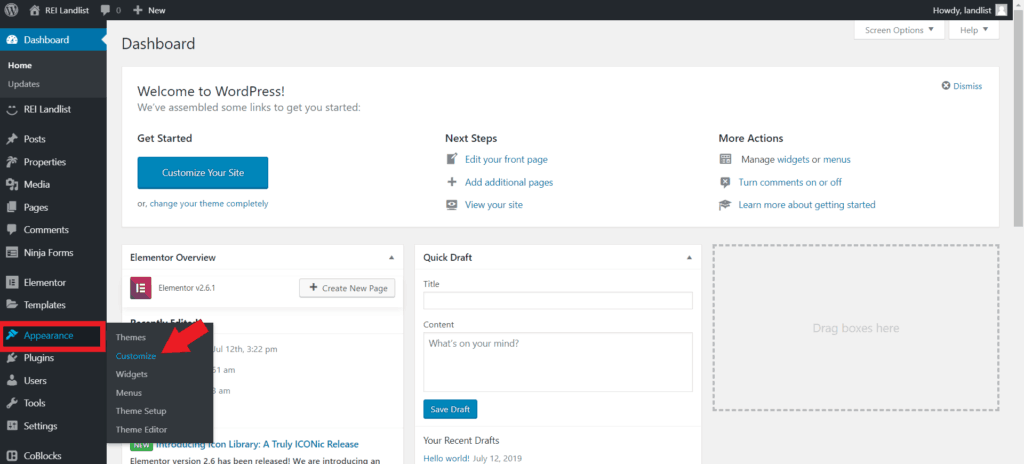
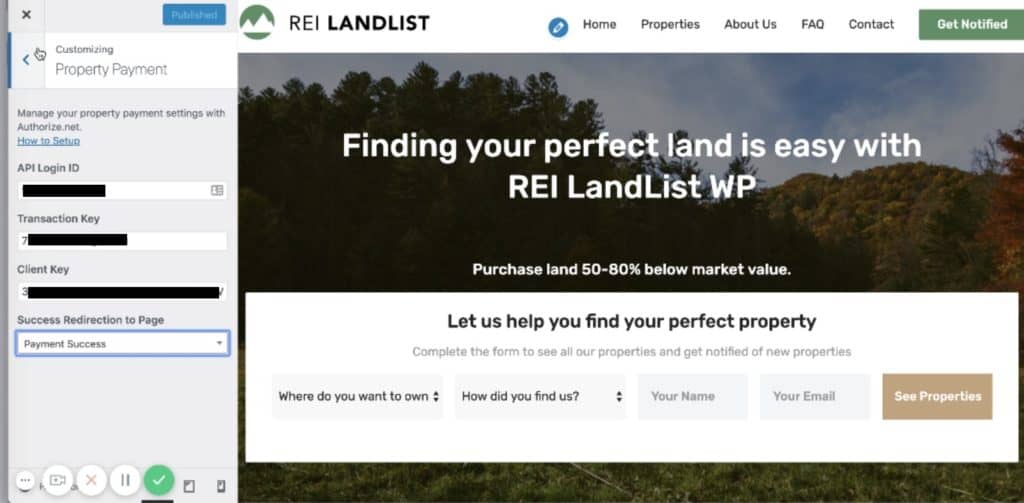
Go to Appearance > Customize in your WordPress Dashboard.
Click on Property Payment.
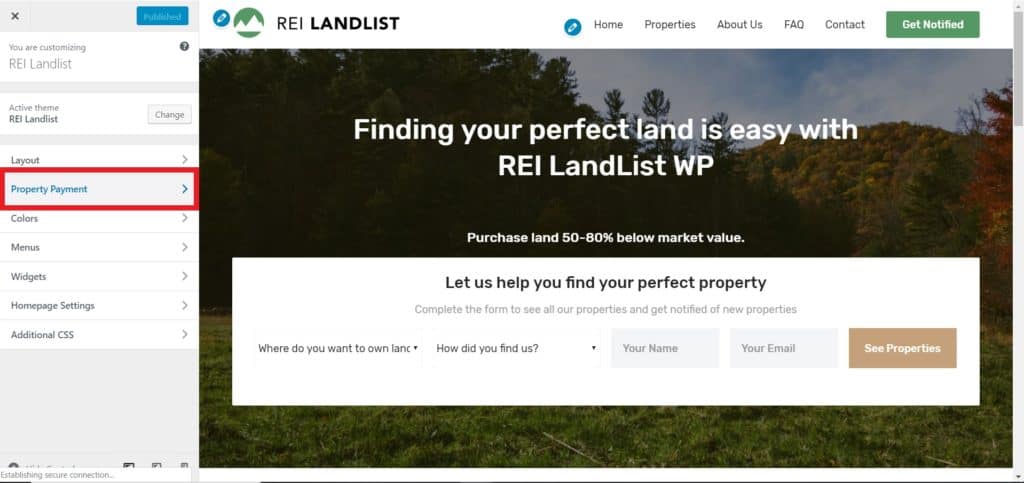
You will see the following options; to add the API Login ID, Transaction Key and Client Key. There'll also be an option to redirect your buyers to a specific page once they've successfully completed their purchase. By default, it's set to 'Payment Success' which is fully customizable in Elementor. We will discuss this later on in the documentation.
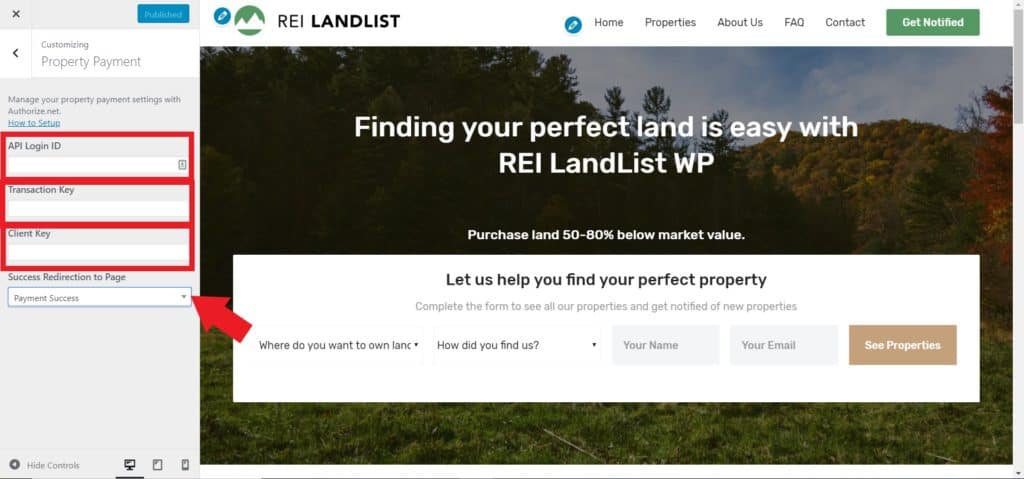
You will then need to head over to authorize.net to get the API Login ID and Transaction Key. If you need further help on this, refer to their documentation.
NOTE: Upon signing up to authorize.net, you will have automatically been assigned an API login ID. We go through where to find it in the steps below.
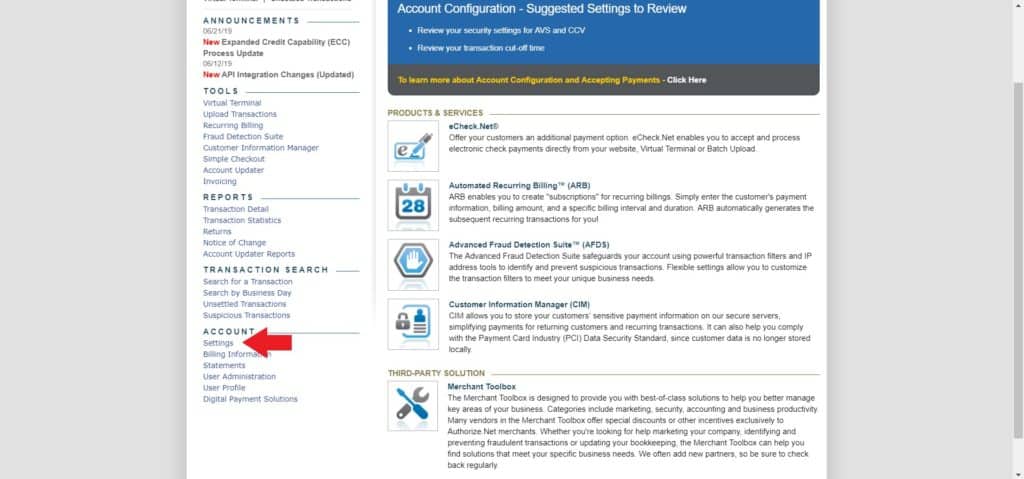
Go to Account > Settings.
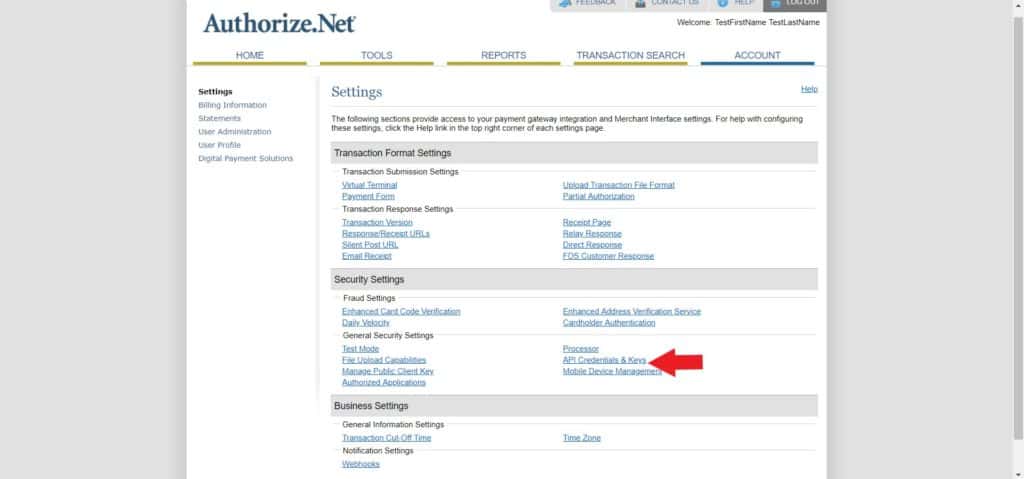
Click on API Credentials and Keys.
You will see your API Login ID on the page which you can paste into the Property Payment section we mentioned above. Next, you'll need to obtain a new Transaction ID. Click the radial button next to New Transaction Key and click Submit.
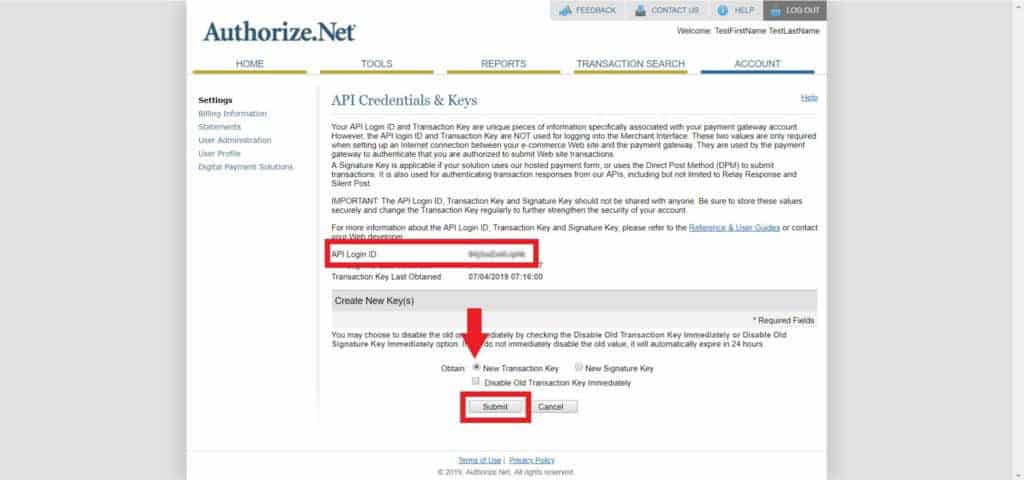
You'll then be prompted to request a pin which will be sent to your registered email address.
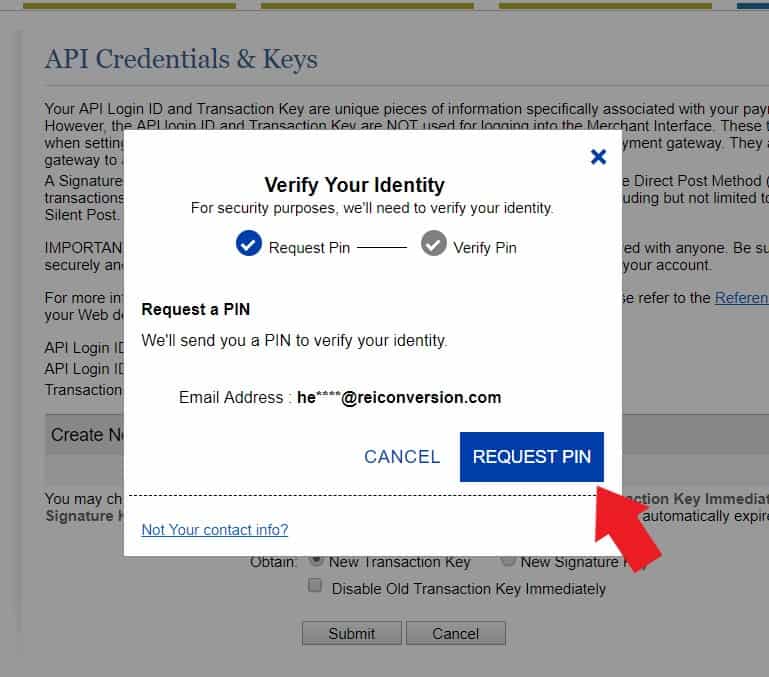
Your Transaction Key will then show up. Paste that key into WordPress.
Next, you'll need to get the Client Key. Go back to the Settings menu.
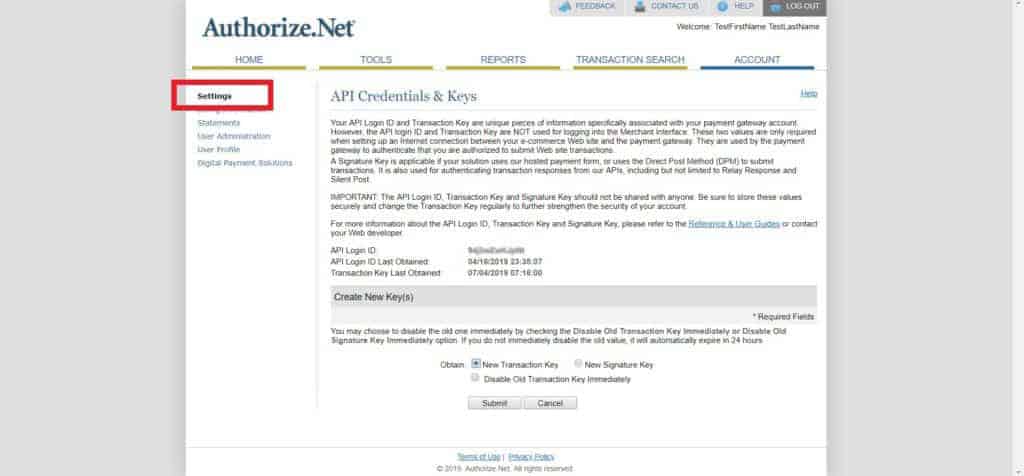
Click on Manage Public Client Key.
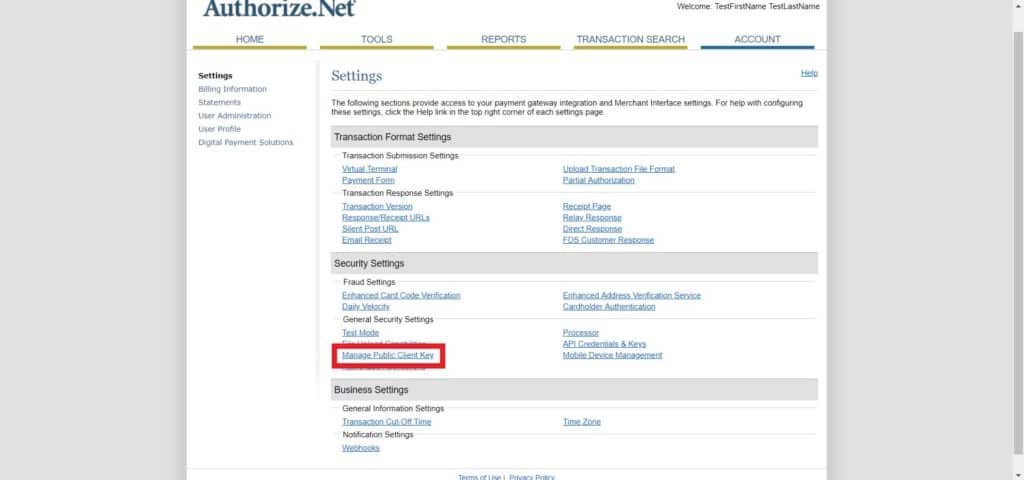
Your Client Key will show at the top. Copy this over to WordPress and you're all set!
Modifying the Payment Success Page
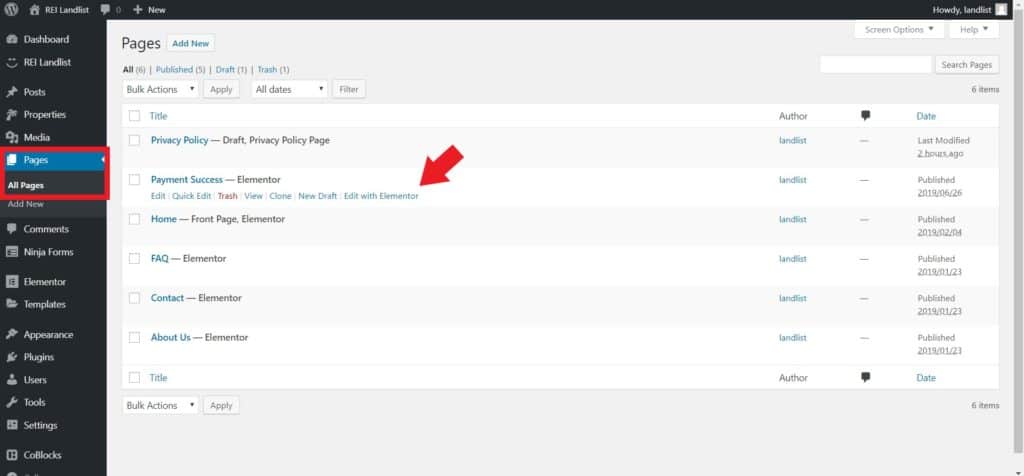
There is a default Payment Success page already set up within the REI Landlist theme. However, if you want to modify any part of it, go to Pages > All Pages in your WordPress Dashboard. Then, hover over Payment Success and click Edit with Elementor.
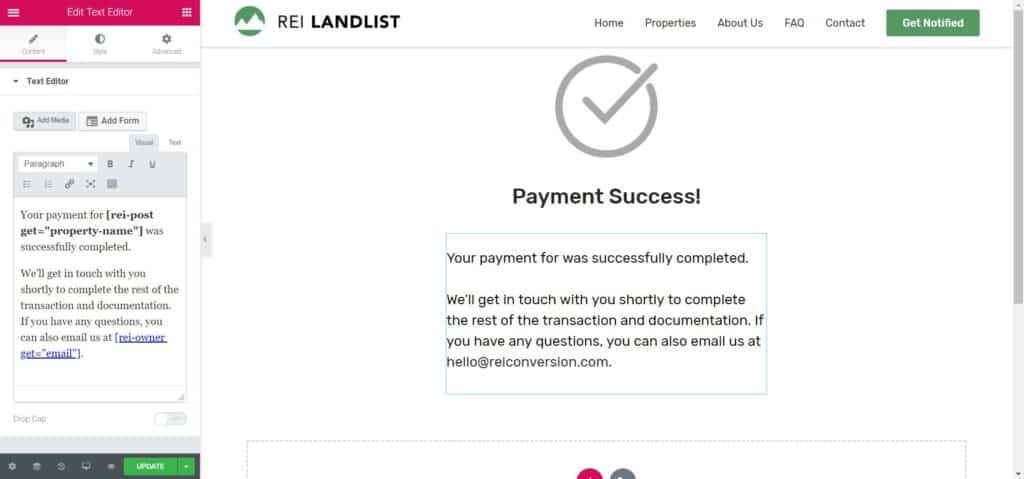
As you can see, you can edit any part of the Payment Success page. There are shortcodes in place to quickly populate your email address if your buyers need it and there's also a shortcode that shows the buyer the name of the property they have just purchased.
This page is the ideal spot to place any additional information that they may need after purchasing.
Setting Up the Payment Buttons on Properties
Now, you can set up the payment buttons for each of your properties. In this example, we're assuming that you will be taking a down payment from the client to secure both cash purchases and finance purchases.
Processing Down Payments (For Cash and Finance Transactions)
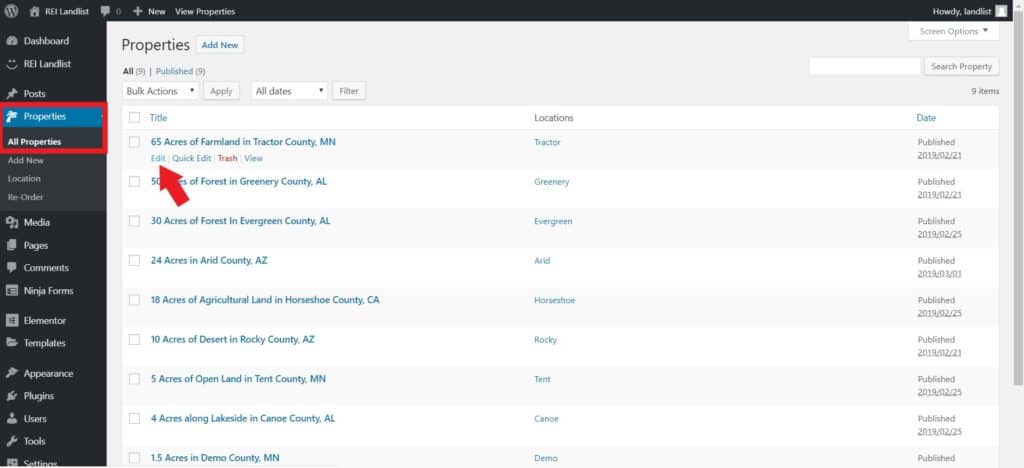
Go to Properties > All Properties on your WordPress Dashboard.
Hover over a property, and click Edit.
Scroll to the block underneath Payment Options and click on it.
On the right side of the page you will see all the editable options for this box; Payment Title, Price, Price Note, Cross Out Price Note, Button Text, Button Options and Button Link.
Go to Button Options and on the dropdown, select Authorize.net.
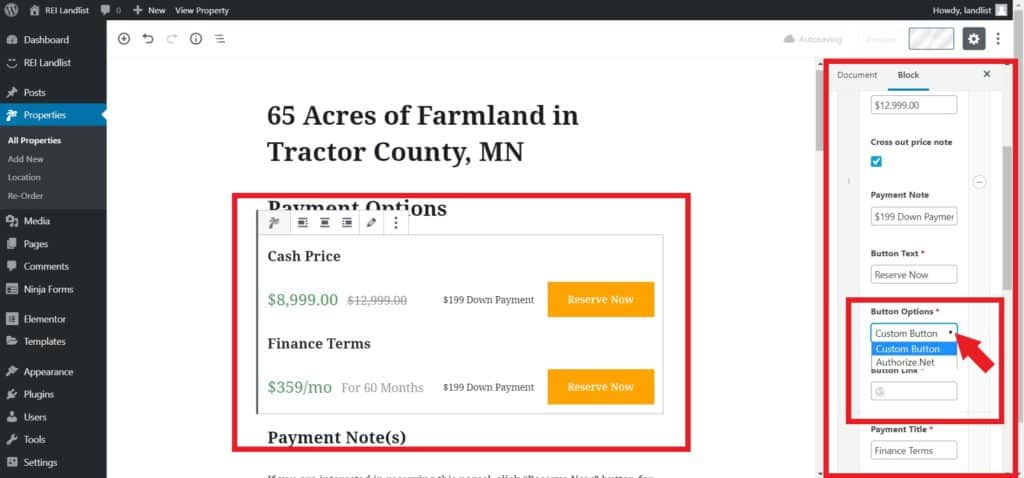
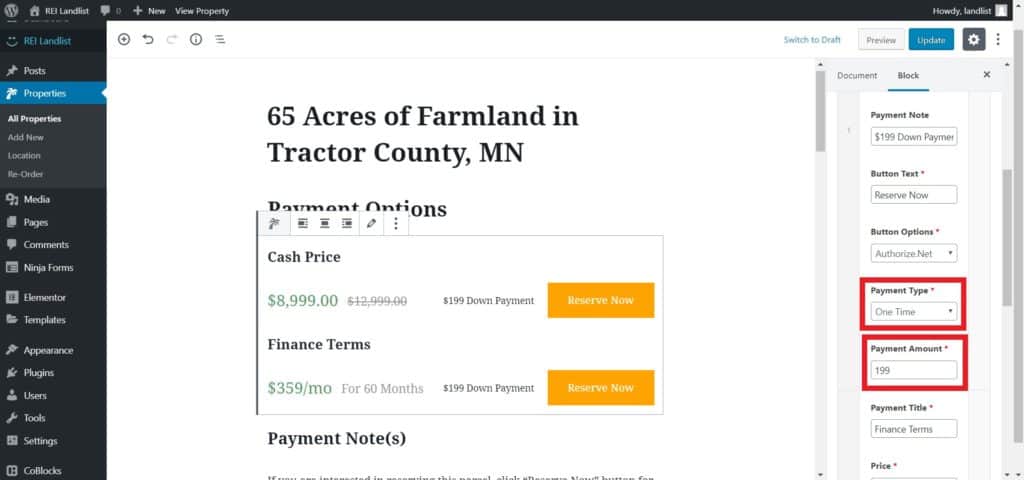
Once that is selected, you will be presented with more options; Payment Type and Payment Amount.
Note: The amounts you put in there won't affect the amounts you see posted, these are changed further up in Price and Price Note.
On Payment Type, click One Time.
On Payment Amount, put the amount of the down payment. In the demo example, it's $199.
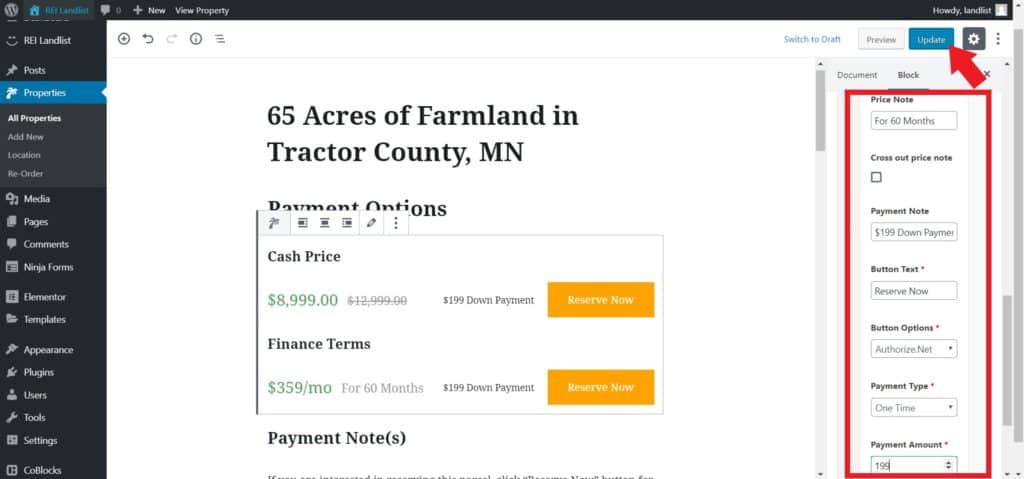
Click Update to save your changes.
Repeat the above steps for the Finance Terms button which is directly beneath the Cash Price option.
Note: Even though this will be monthly payment, you'll still need to set this initial transaction up as a one-time payment under Payment Type. This is because you'll only be taking the down payment using this button to start with.
Once this is done, click Update to save your changes.
Processing the Balance on Cash Transactions
If you have requested a down payment for the Cash Price option, you will need a way to process the remaining balance because currently, the property's page only has a button to reserve/process payment of $199.
The easiest way to do this is to duplicate the property listing and modify the payment button to take the remaining payment from the client.
First, duplicate the page of the property that you've sold. Click here for help duplicating a page.
Next, click on edit to edit the new payment page. You'll know it's the duplicate as it will be saved as a draft.
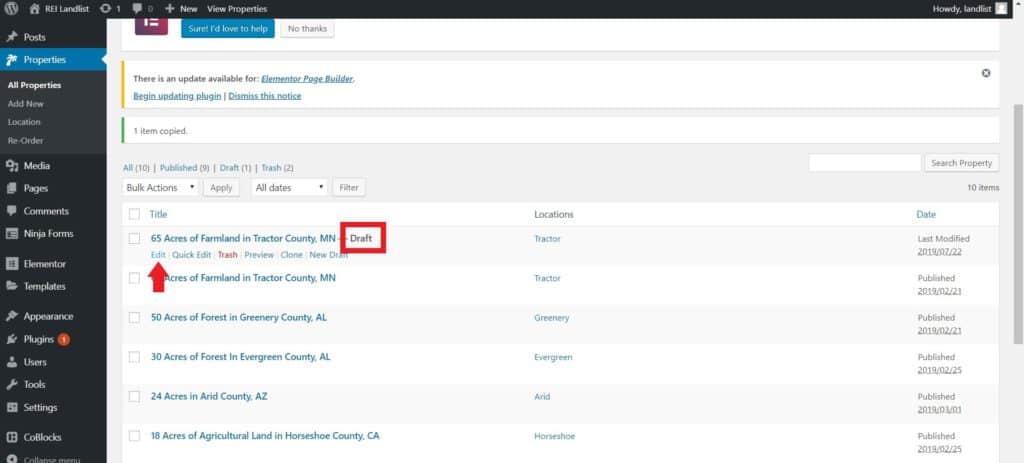
As you can see in the example below, we made a few modifications to the information that shows by the button to process the payment.
We put the balance owing under Price, put the price prior to the downpayment under Price Note and checked the box to cross it out. Under Payment Note, we put a message saying 'Balance Owing' and then changed the Button Text to show 'Pay Now'.
Of course, you can customize this completely to your liking.
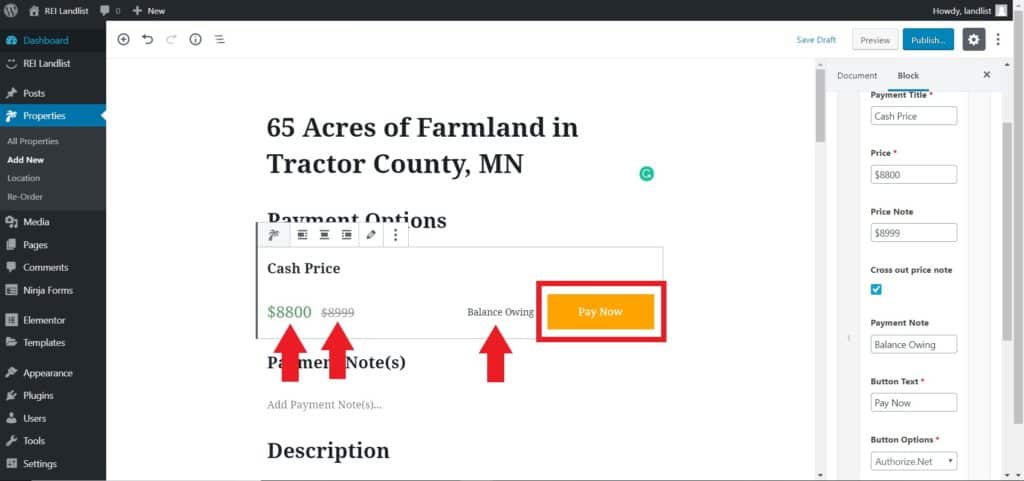
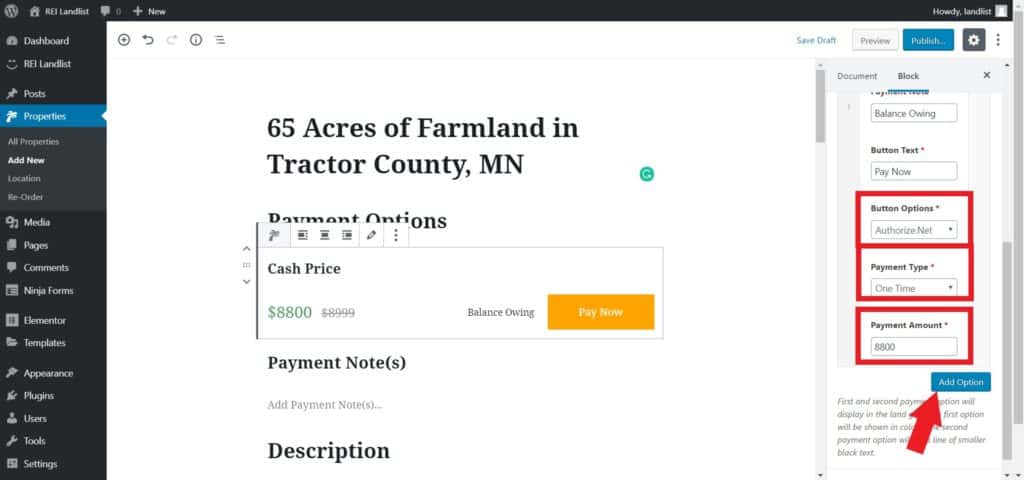
For all-cash transactions, like this example, the payment portal is set up the same as for the down payment.
Under Button Options, select Authorize.Net.
Under Payment Time, select One Time.
Under Payment Amount, put the remaining balance of the property.
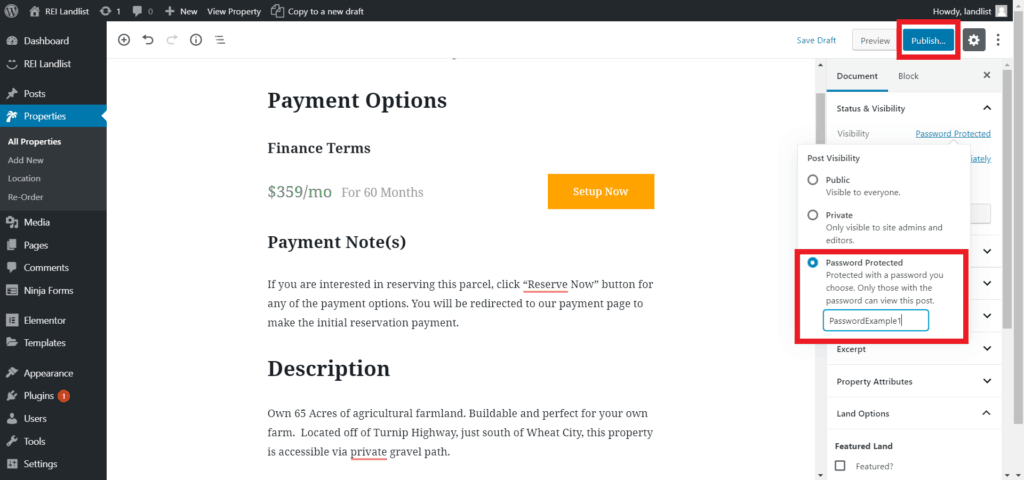
Once the payment page is set up, turn it into a password protected page.
To do this go to the Document tab on the right-hand side and under Status & Visibility, click the hyperlink next to Visibility.
Then, select Password Protected and enter a password for the page.
Click Publish to save the webpage.
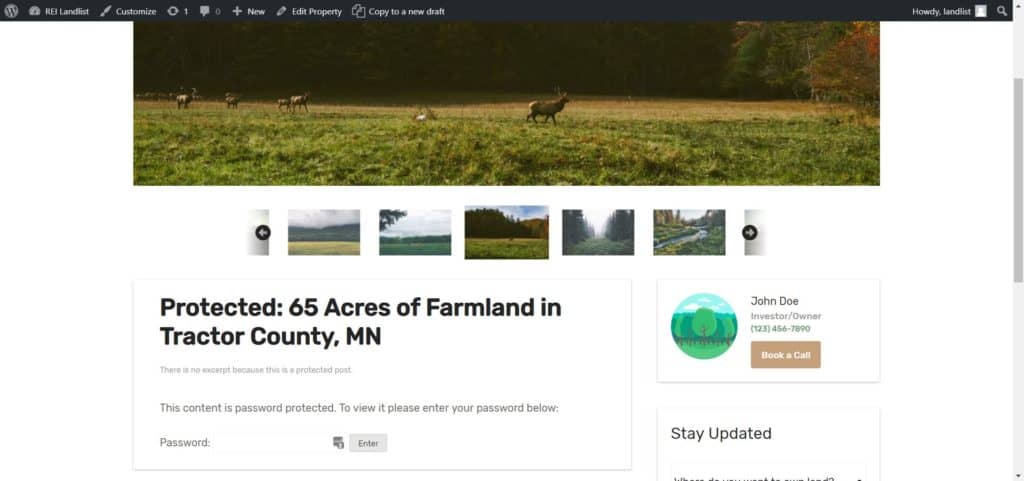
You can then email the link of the page to the buyer, along with the password, to complete the transaction.
Setting Up Recurring Payments (Finance Terms)
For recurring payments, the process is slightly different.
First, duplicate the page of the property that you've sold. Click here for help duplicating a page.
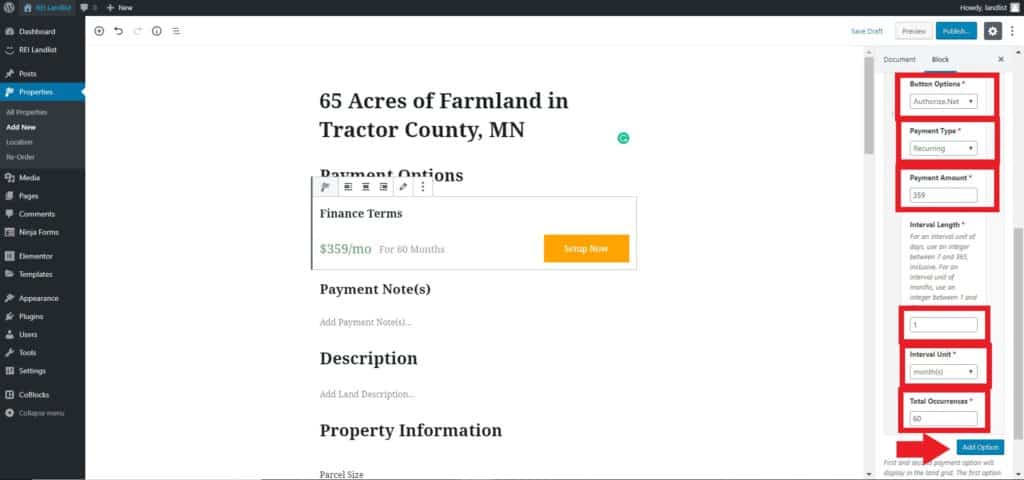
Under Price, put the price per week or month. Under Price Note, put the length of the term and uncheck the box so it's no longer crossed out. In this example, we changed the Button Text to show 'Setup Now', but you can put whatever you'd like.
Under Button Options, select Authorize.Net.
Under Payment Time, select Recurring.
Under Payment Amount, put the amount to be repaid each week/month or whichever.
Under Interval Length, you need to select a number representing the frequency of payments, i.e. 1, 2, 5, 10 and so on.
For recurring payments, the process is slightly different.
First, duplicate the page of the property that you've sold. Click here for help duplicating a page.
Under Price, put the price per week or month. Under Price Note, put the length of the term and uncheck the box so it's no longer crossed out. In this example, we changed the Button Text to show 'Setup Now', but you can put whatever you'd like.
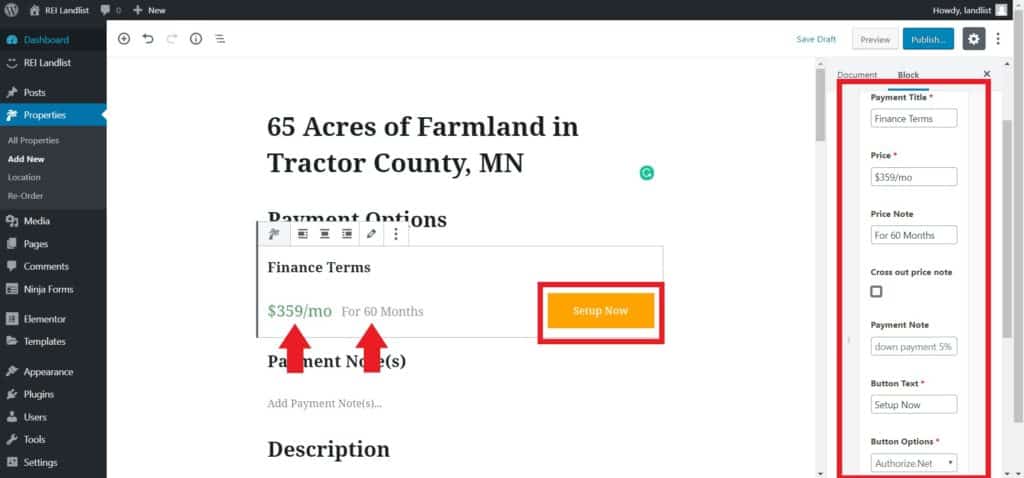
Under Button Options, select Authorize.Net.
Under Payment Time, select Recurring.
Under Payment Amount, put the amount to be repaid each week/month or whichever.
Under Interval Length, you need to select a number representing the frequency of payments, i.e. 1, 2, 5, 10 and so on.
Under Interval Unit, you need to select the unit of time you want to use, i.e. each day, week, or month.
In this example, the payment terms are $359 per month for 60 months. So we put ' 1' for Interval Payment, indicating one payment, and we put 'month' for the Interval Unit as there will be one payment per month.
Under Total Occurrences, put the number of times the payment will occur. In this example, it's 60.
Finally, click Publish to save changes.
Once the payment page is set up, turn it into a password protected page.
To do this go to the Document tab on the right-hand side and under Status & Visibility, click the hyperlink next to Visibility.
Then, select Password Protected and enter a password for the page.
Click Publish to save the webpage.
You can then email the link of the page to the buyer, along with the password, to complete the transaction.
Testing Payments for Authorize.net
For security reasons, all new Authorize.Net accounts are in Test Mode. When an account is in Test Mode, transactions may be submitted that will not be authorized or charged to the account numbers provided in the transactions. As the name states, the Test mode is good for testing without passing any information through for Authorize.net to record.
To take your account out of Test Mode, please follow these steps:
- Log into the Merchant Interface.
- Click Account from the main toolbar.
- Click Settings in the main menu on the left.
- Click Test Mode under the Security Settings section.
- Drag the toggle to Live. The interface will confirm that the Test Mode settings have been successfully applied and the account is now in Live Mode.
Policy Pages Required by Heartland
Heartland will require you to have the following pages on your site:
- Privacy Policy
- Terms of Service
- Refund Policy
Please ensure to request from Heartland these three document templates which they will be able to provide you.
Once you received those documents, you can copy the text from those documents into their own pages on your website.
To add these pages you can simply go to your WP Admin > Pages
There will be an existing Privacy Policy page that is in draft mode, with template text. You can simply replace this text by copy and pasting the text from the provided documents from Heartland. Please be sure to modify and alter to fit your business.
Once complete, you can Publish the page.
Next you'll want to go back to the Pages menu and mouse over the Privacy Policy page and select Clone

Once you've cloned the Privacy Policy page, click the page, rename it to Terms of Service and/or Refund Policy, and repeat the clone page steps and copy and paste the document text provided by Heartland.
You can now notify your Heartland representative that you have created those pages.
What To Do If You Get An Error Due To Invalid Authentication Code
.png)