
Pebble Lead Forms
Use Pebble to build lead forms and share them with a link, embed them on your website, or send them to your call answering service. Every submission lands in your Pebble inbox as a new conversation, so you never lose a lead.
In this article:
Build a Lead Form
- Click Inboxes on the left sidebar.
- Open the inbox you want the form connected to (for example, your Seller Inbox) and click the Settings (gear) icon in the top-right corner. You can also click the gear icon next to the inbox on the Inboxes page.
- Click the Lead Forms tab at the top of Inbox Settings.
- Click Add Lead Form.
Submissions from this form will go to the inbox you created it in.
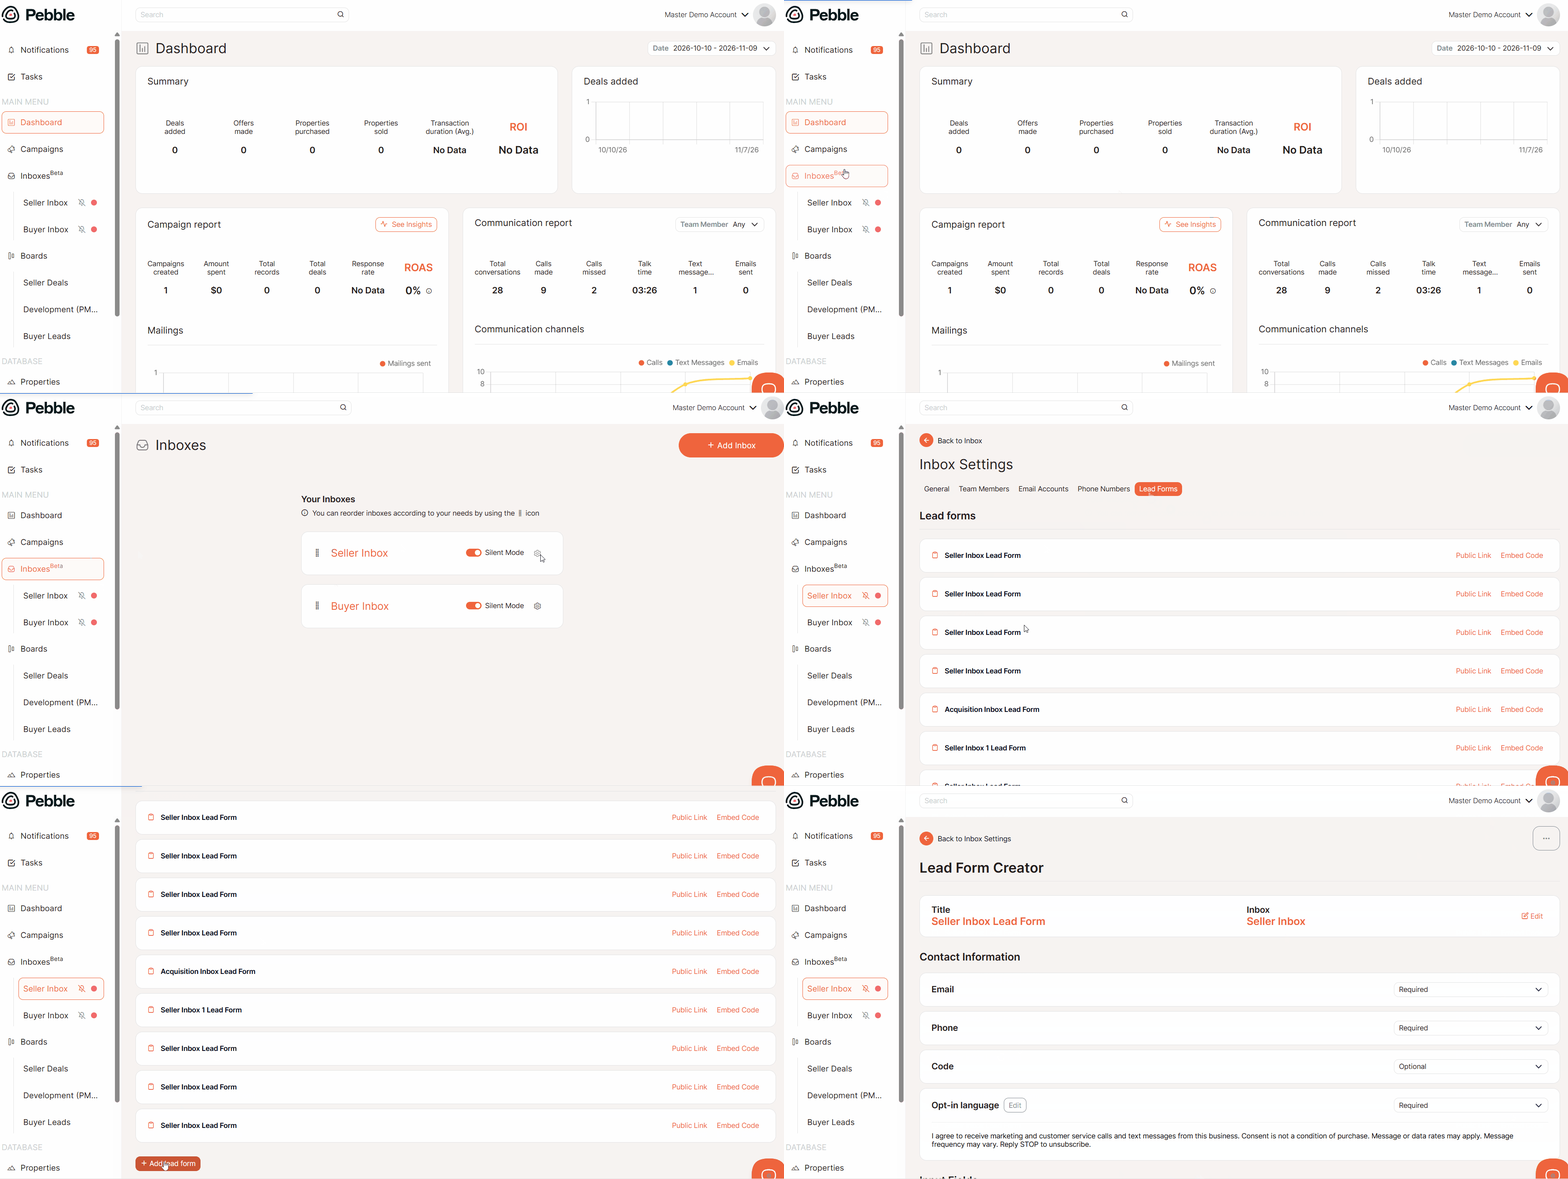
This is also where you'll find your existing forms. To see the answers people submitted, open the inbox and click the new conversation. See What happens after someone submits.
You can change the name of your form by clicking the Edit icon at the top of the lead form name. Hit Save Changes.

Contact Information Fields
When creating a new Lead Form, you’ll see a Contact Information section. This section includes pre-approved fields such as:
- Name
- Phone
- Code
- Opt-in Language

For each field, you can use the dropdown menu to set its status as:
- Required – the lead must provide this information.
- Optional – the lead may skip this field.
- Hidden – the field will not be visible on the form.

Opt-in Language
The opt-in language is the short message people see on your form so they know what they're agreeing to (for example, how you'll use their contact information or that you may text them).
You can customize it to match your business needs.
- Locate the Opt-in Language field in the Contact Information section.
- Click the Edit button.
- Type in your preferred message (e.g., how you’ll use a lead’s contact information or ask for consent).
- Click Save to apply your changes.

Input Fields (your own questions)
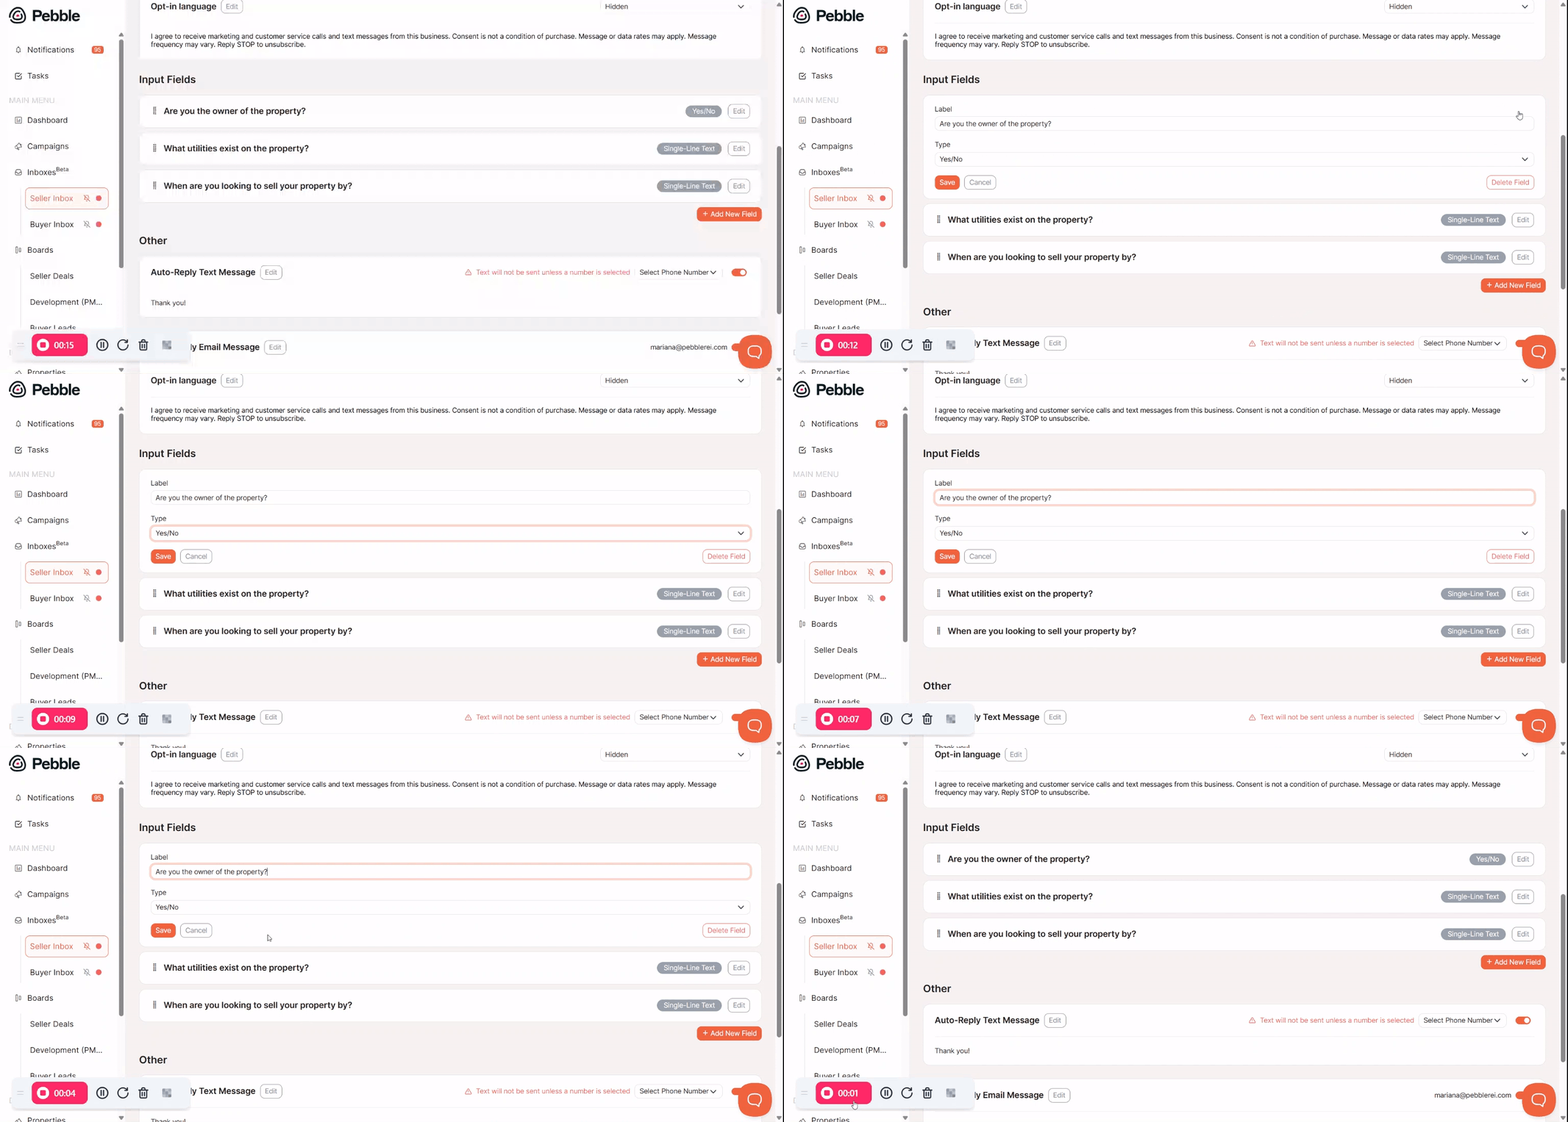
Want to qualify leads right in the form? Use the Input Fields section to add your own questions.
- Click + Add New Field.
- Fill in the Label (the question) and the Type.
- Click Save.
These are the field types available:
- Single-line text – allows the user to enter the short text that fits in a single-line
- Multi-line text – allows the user to enter the longer text that fits in multiple lines
- Dropdown – allows the user to choose one from multiple options
- Yes/No – allows the user to choose between "Yes" and "No"

You can add as many fields as you need. To change or delete a field later, click Edit next to it.
Auto-reply Messages
After someone submits your lead form, you can automatically send them a confirmation message via text and/or email. Both are optional, and you can switch each one on or off.
This helps acknowledge their interest immediately and sets expectations for next steps.
Setting Up Auto-Replies
In the "Other" section of your lead form settings, you'll find two auto-reply options:
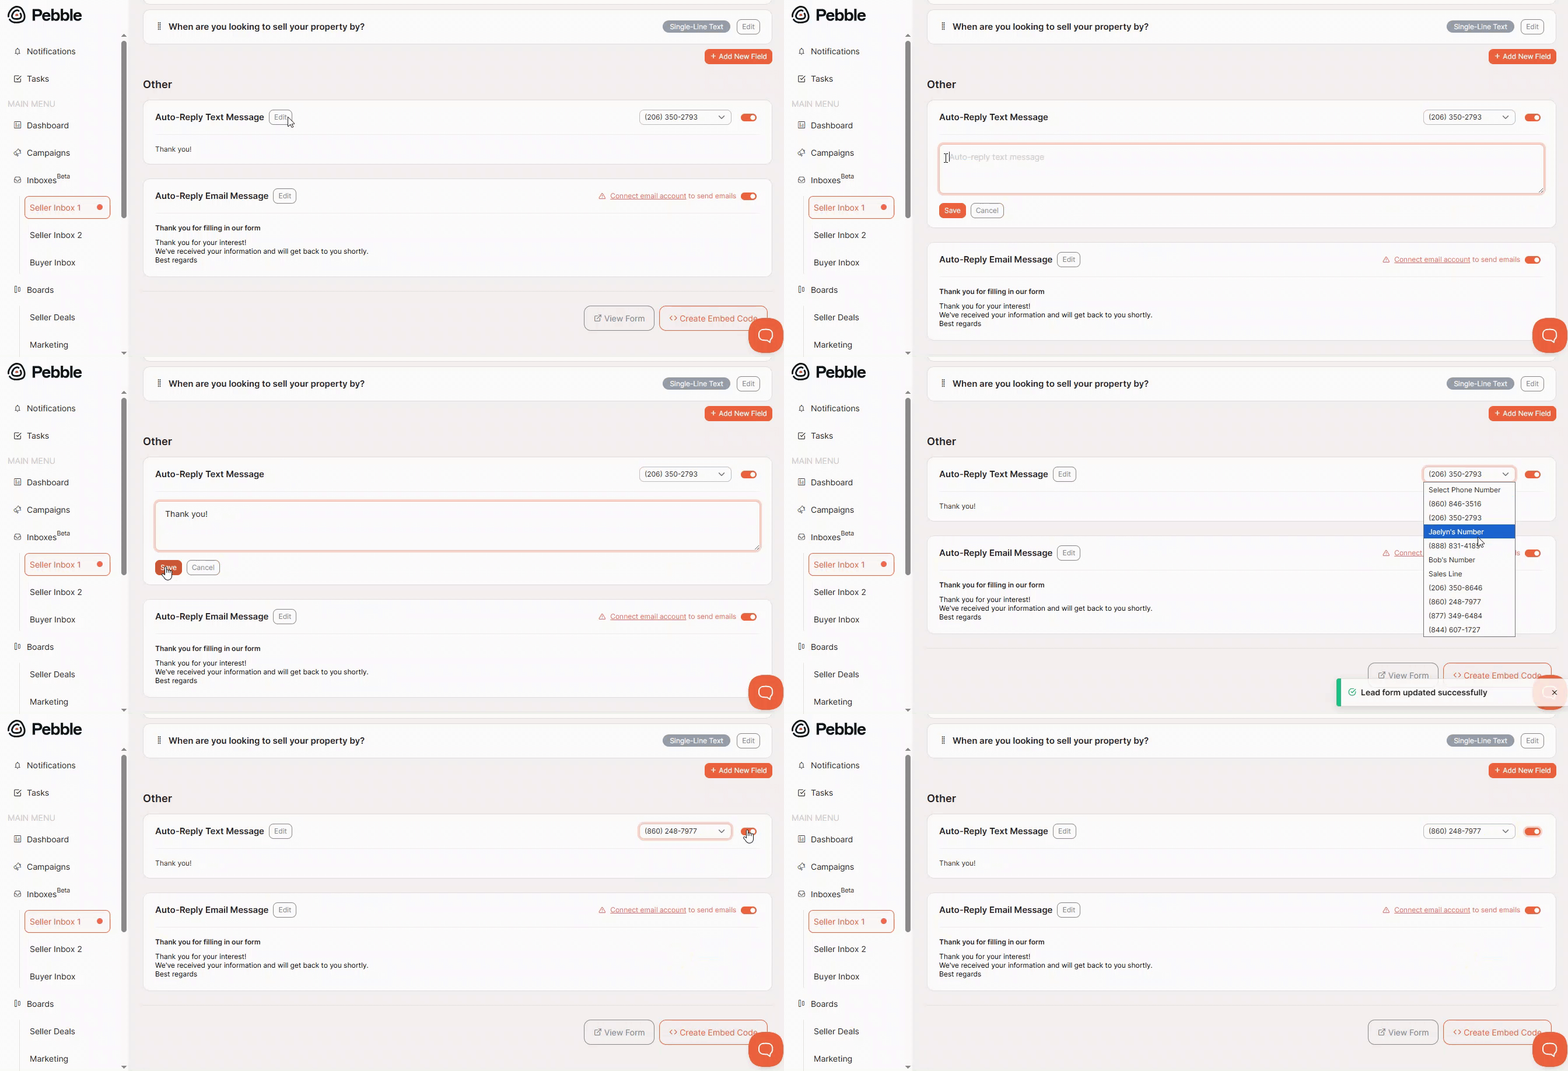
Auto-Reply Text Message
- Click Edit to write your message, then Save.
- Choose the phone number the text will be sent from.
- Toggle it on.
- Make sure that number is set up for texting (A2P registration complete). See A2P 10DLC Registration.
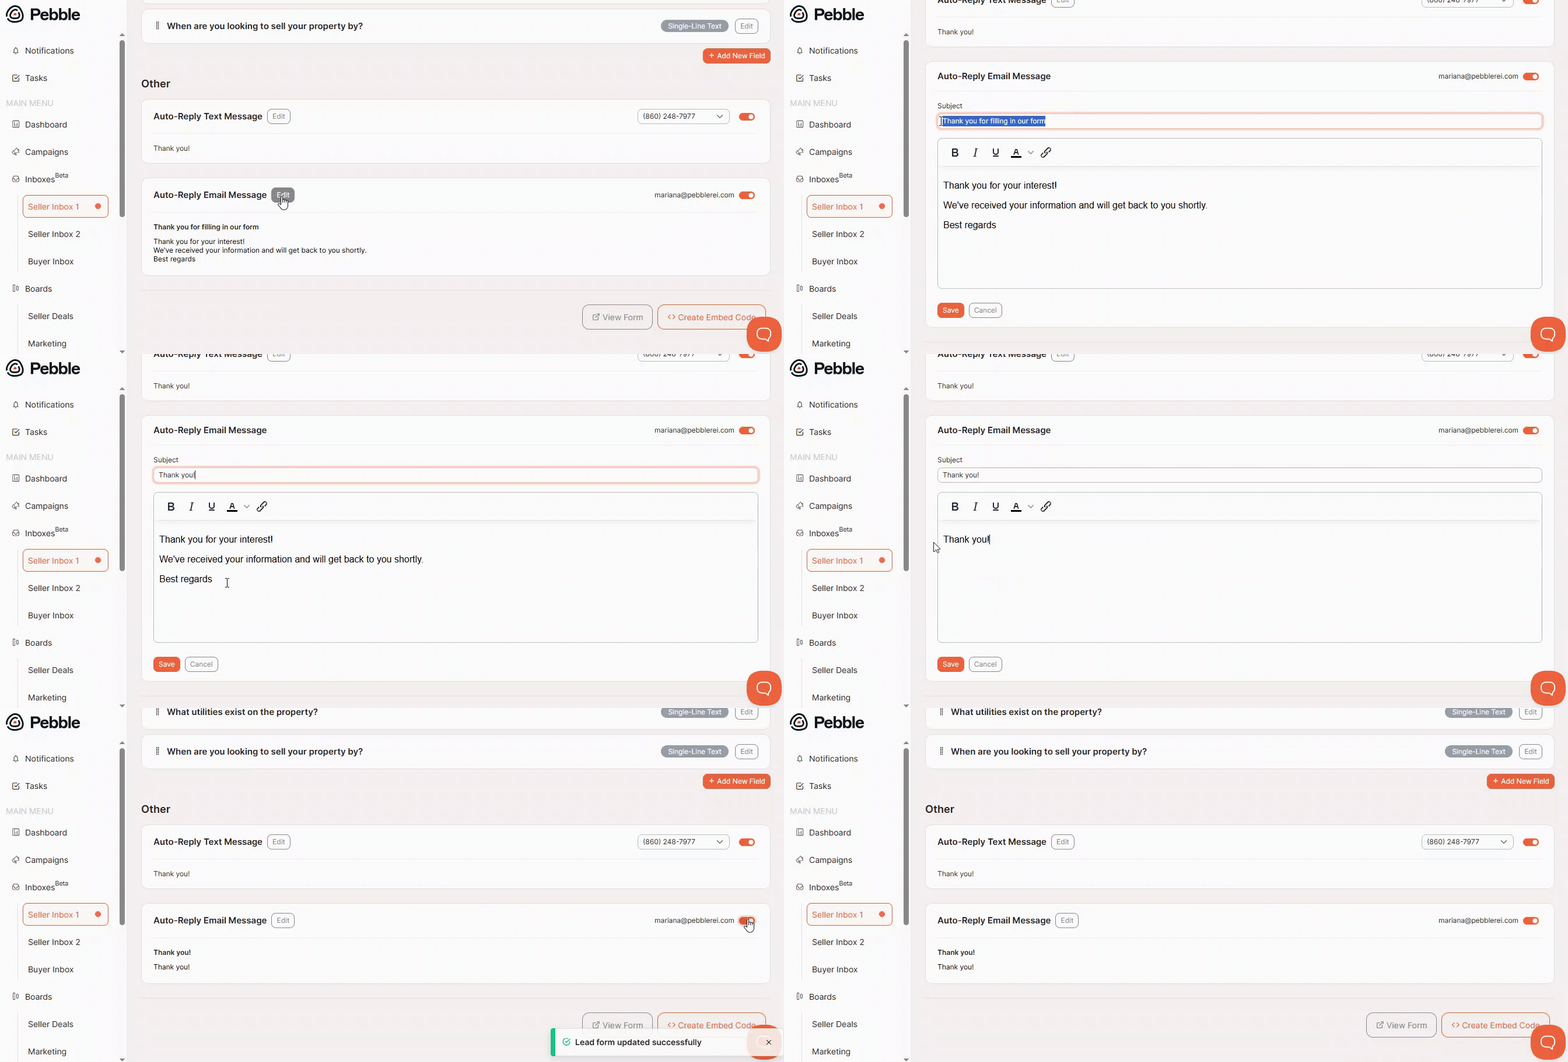
Auto-Reply Email Message
- Click Edit to add a subject line and your message, then Save.
- Connect an email account to your inbox first if you haven't yet.
- Toggle it on.
Best Practices
- Keep messages brief and friendly
- Confirm receipt of their information
- Set clear expectations about response timing
- Make sure your phone number and email account are properly connected before enabling auto-replies
- Test your auto-replies by submitting a test form entry yourself
Share Your Form
You have two ways to get your form in front of people: a link, or an embed on your website.
Option 1: Share the public link
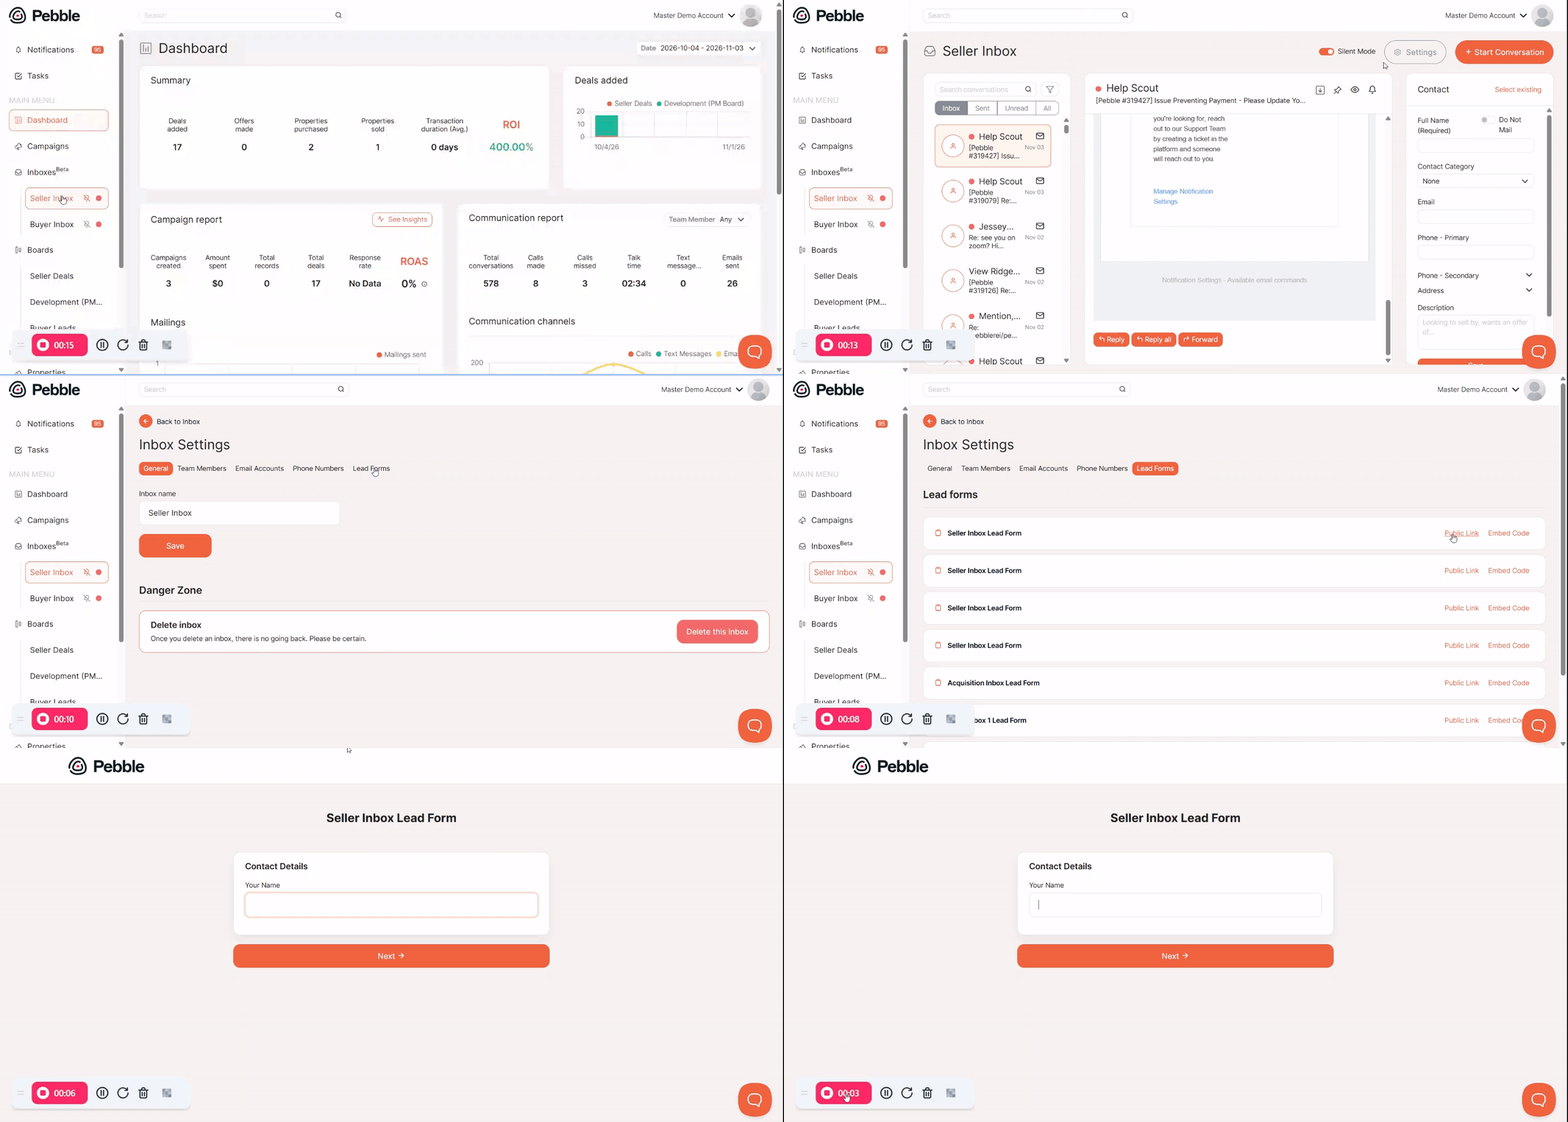
- Go back to your inbox Settings and click the Lead Forms tab.
- Find your form in the list and click Public Link.
- A new page with your form opens. Copy that URL and share it anywhere: email, social, a QR code, or your call answering service.
Option 2: Embed the form on your website
- In your lead form settings, click Embed Code.
- In the pop-up, choose where the form will be installed:
- Pebble Website if you have a Pebble website.
- Custom Website if you have any other website.
- Choose the layout and skin of the form.
- Click Copy Snippet.
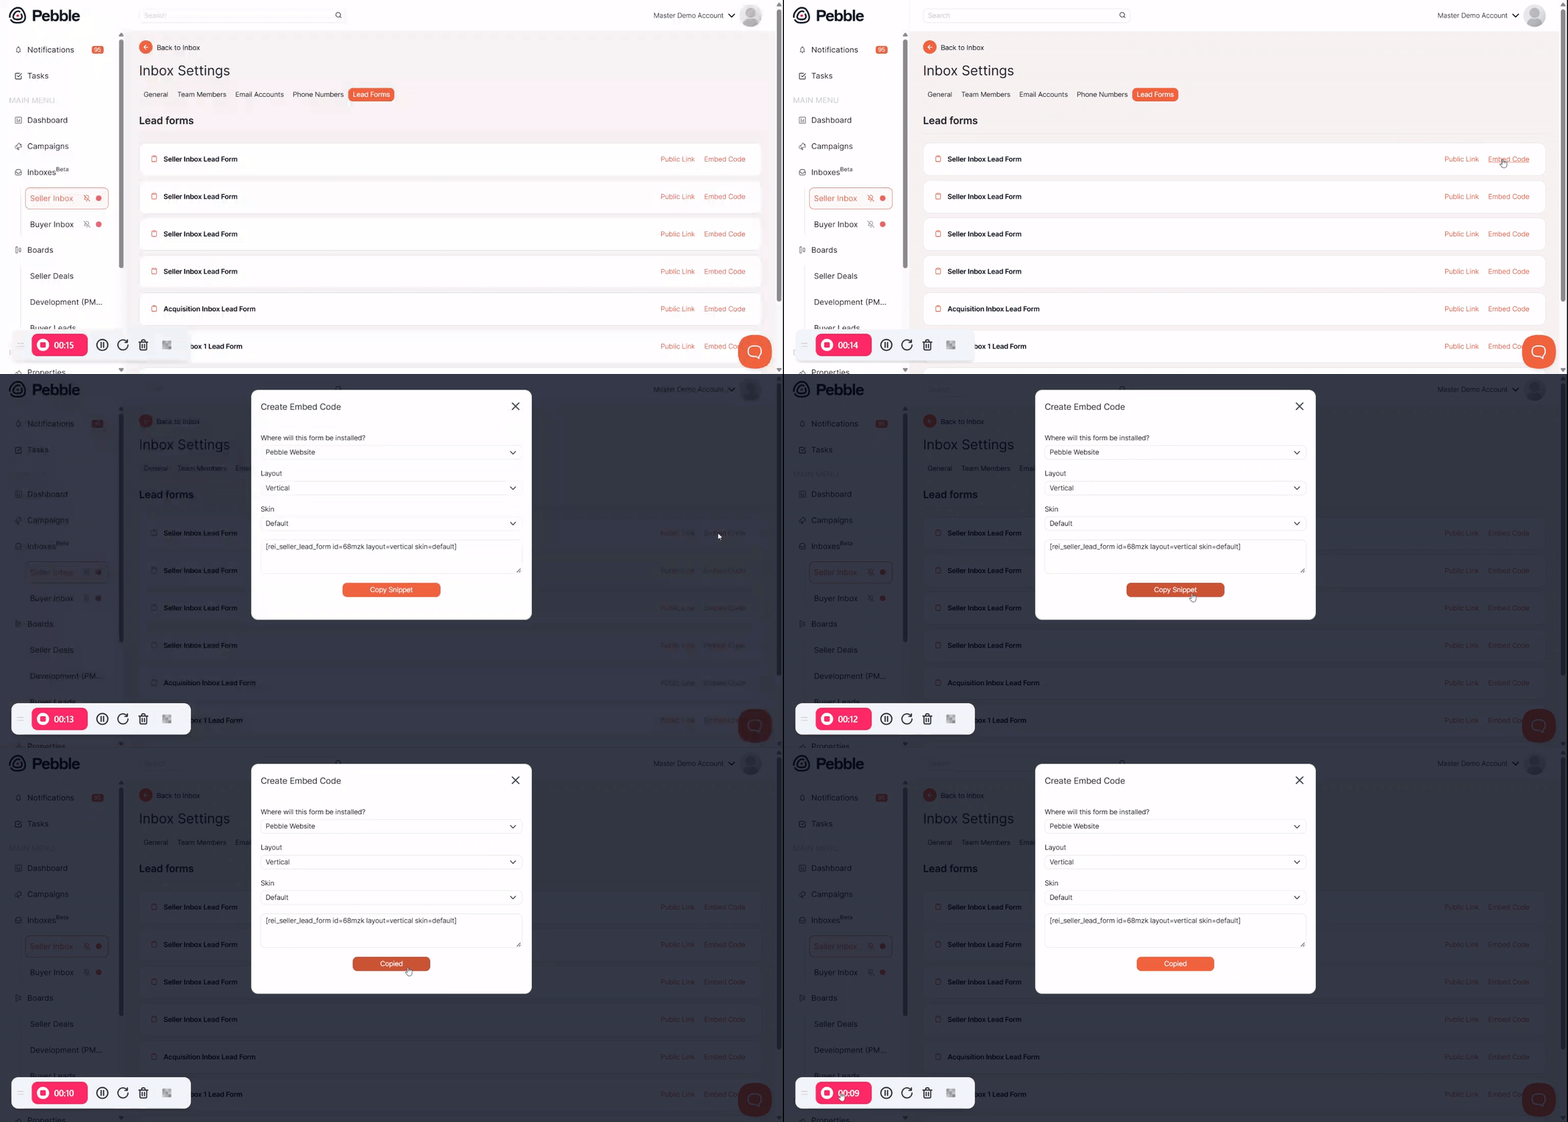
Where you paste the snippet depends on your website:
- Pebble Website: you'll paste it as a shortcode. Follow the steps in Adding a lead form to a Pebble Website below.
- Custom Website: paste the snippet anywhere on your page that allows HTML.
Tip: customize how the form looks. On top of skin and layout , you can add these parameters to the shortcode or the HTML snippet:
primaryandprimary_alt: any valid HTML color code.body_font_family: the form's font.button_text: the text on the submit button.
These work in both the shortcode and the HTML version of the snippet.
Preview your form
Not ready to share yet? Click View Form to see how your form looks.

Adding a lead form to a Pebble Website
Use these steps if you chose Pebble Website when you generated your snippet in Option 2 above.
This option needs the REI Pebble - Land CRM Plugin installed and activated on your website. It is deactivated by default, so turn it on before using the shortcode.

Add the form to your Pebble website
Head to the backend of your website by logging into your WordPress account. Then click "Pages" and choose "All Pages."

A new page will open up. Find your home page and click "Edit with Elementor."

Once your home page opens up, the first thing you need to do is to hide your existing form. To do so, click on the "Navigator" icon at the bottom of the page.

This will open up a navigator menu on your screen. Use it to find the existing form on your website, so you can remove it and replace it with your new form.

Once you find the form, click on it. A new menu will open up on the left side. Find the option called "Responsive" and choose to hide the form for all devices.

Now, you need to add the new form to your home page. Use the search bar on the left side to find a widget called "Shortcode." Click on it and drag it to the spot where you'd like your form to be. Then, use the Navigator on the right side to move the "Shortcode" under the "Icon." This can also be done just by clicking on the button and dragging it down.

Once you place the widget on your home page, it's time to add the code. Paste the copied snippet from Pebble's Embed Code page. If you need the snippet again, go back to your lead form settings and click Embed Code, then Copy Snippet.

Then, paste the shortcode in the box on the left side of your screen.

Keep in mind that there are two forms on your home page - one at the top and the other at the bottom of the page. Repeat the previous steps to replace the form on the bottom of your home page as well. Then, click on the "Update" button to save changes to your website.

What the seller sees
Before a lead reaches your inbox, this is what the seller goes through when they fill out your form on a website or a mailer page:
- They enter their contact information.

- They can enter the mailer code from their letter. This step is optional, and they can skip it.
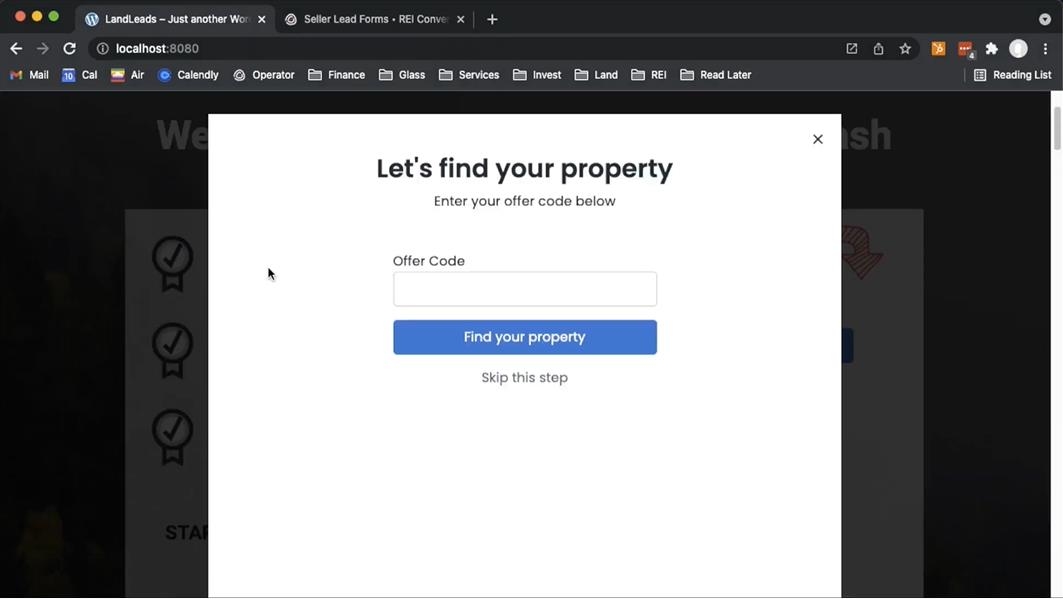
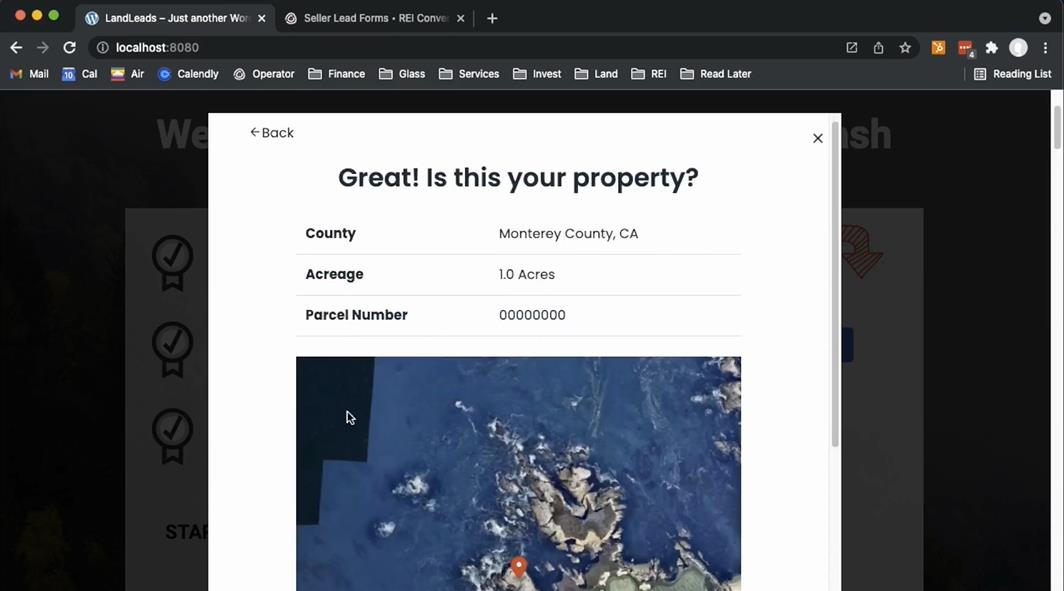
- If they enter a code, Pebble shows the property details, plus a photo of the property (if Pebble has the latitude and longitude). They review it and click Yes to continue.
- Your form is displayed. They answer your questions and submit.
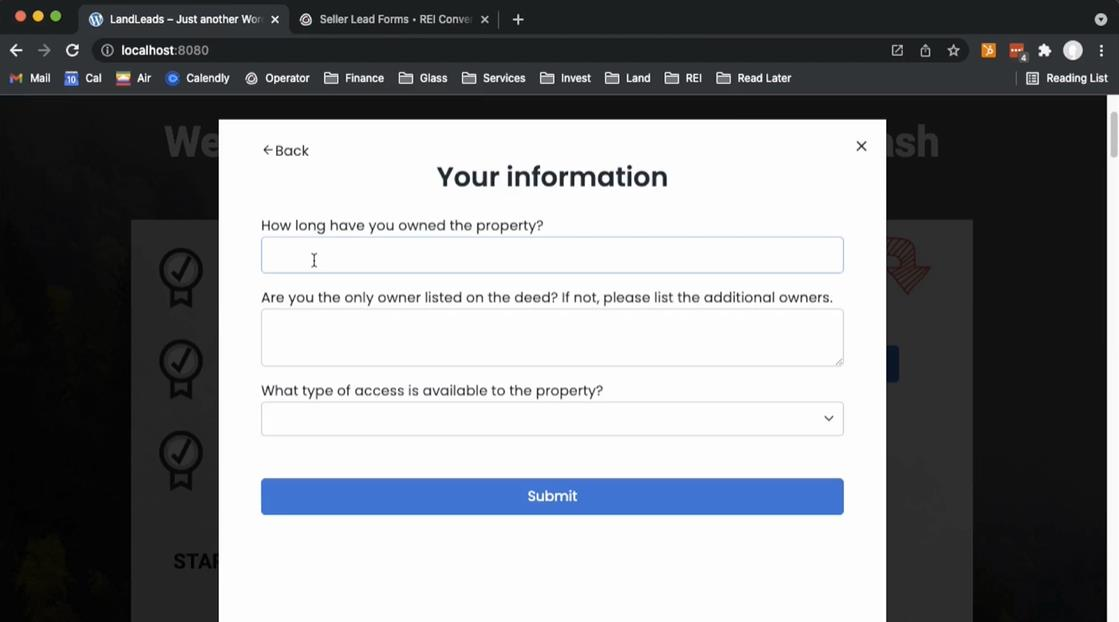
Once they submit, the lead arrives in your inbox.
Using a lead form with a call answering service
If you use a call answering service, their agents can send you the details of every call by filling out a Pebble lead form, so those leads show up in Pebble right away instead of in an email.
- Build a lead form in the inbox where you want these leads to land.
- Add the questions your agents should ask on each call (see Input fields). If agents don't need a field, set it to Hidden.
- Copy the Public Link (see Share your form) and send it to your call answering service.
- Ask the agents to fill out the form for every lead. Each submission creates a new conversation in your inbox.
Before you go live, submit a test entry yourself to make sure it arrives in the right inbox. If you turned on auto-replies, remember they go to the lead, so decide whether you want them on for leads coming from agents.
What happens after someone submits
When someone submits your form, the lead arrives in your inbox as a new conversation. If you have lead form notifications turned on, you'll also get notified (see Notifications).
From there, the flow is: review the answers, then create a deal if the lead is worth pursuing. (Leads from your call answering service work the same way.)
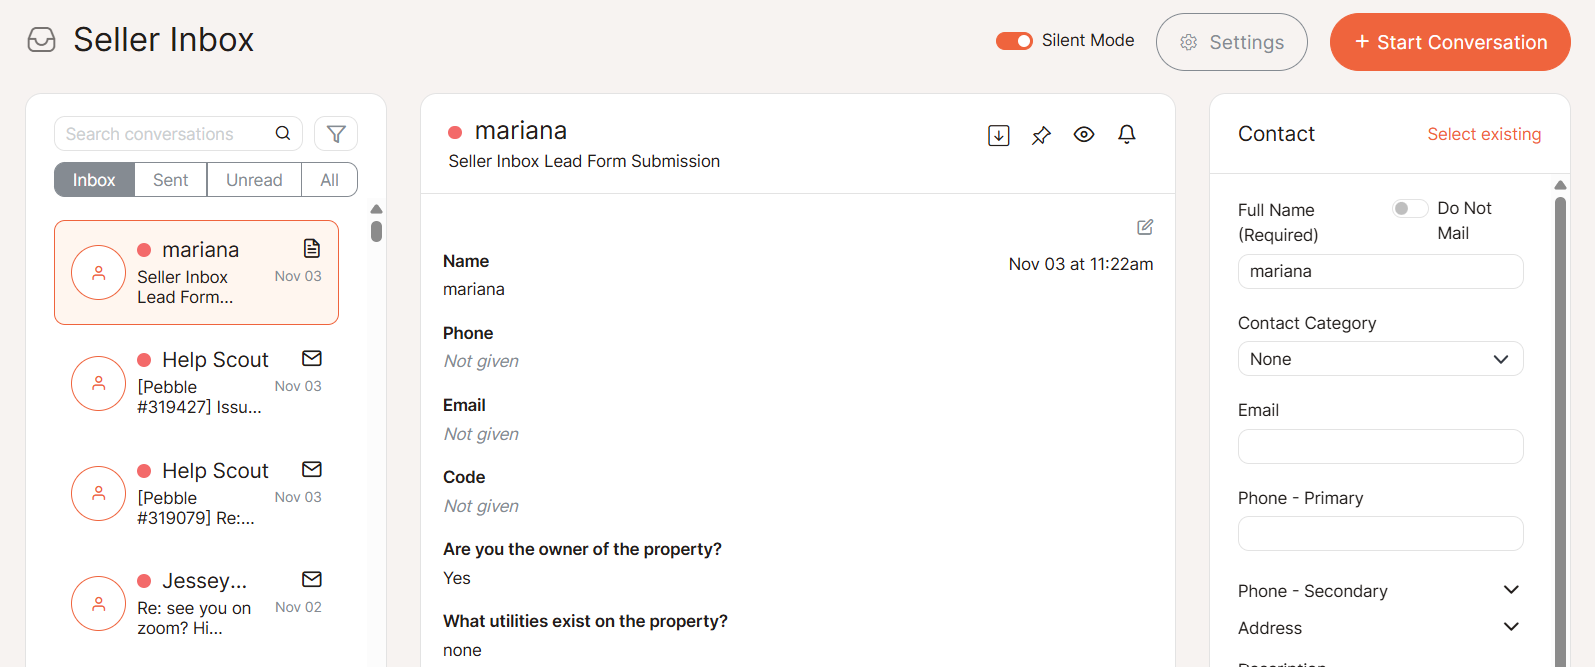
1. Review (and edit) the answers
Open the inbox the form is connected to and click the new conversation. The form response appears at the top as a card called Lead Form Submission. It lists each field (Name, Phone, Email, Code) and your own questions with the lead's answers. Fields the lead left empty show as "Not given".
To edit the answers, click the pencil icon in the top right corner of the card. This is handy when you talk to the seller and learn more.
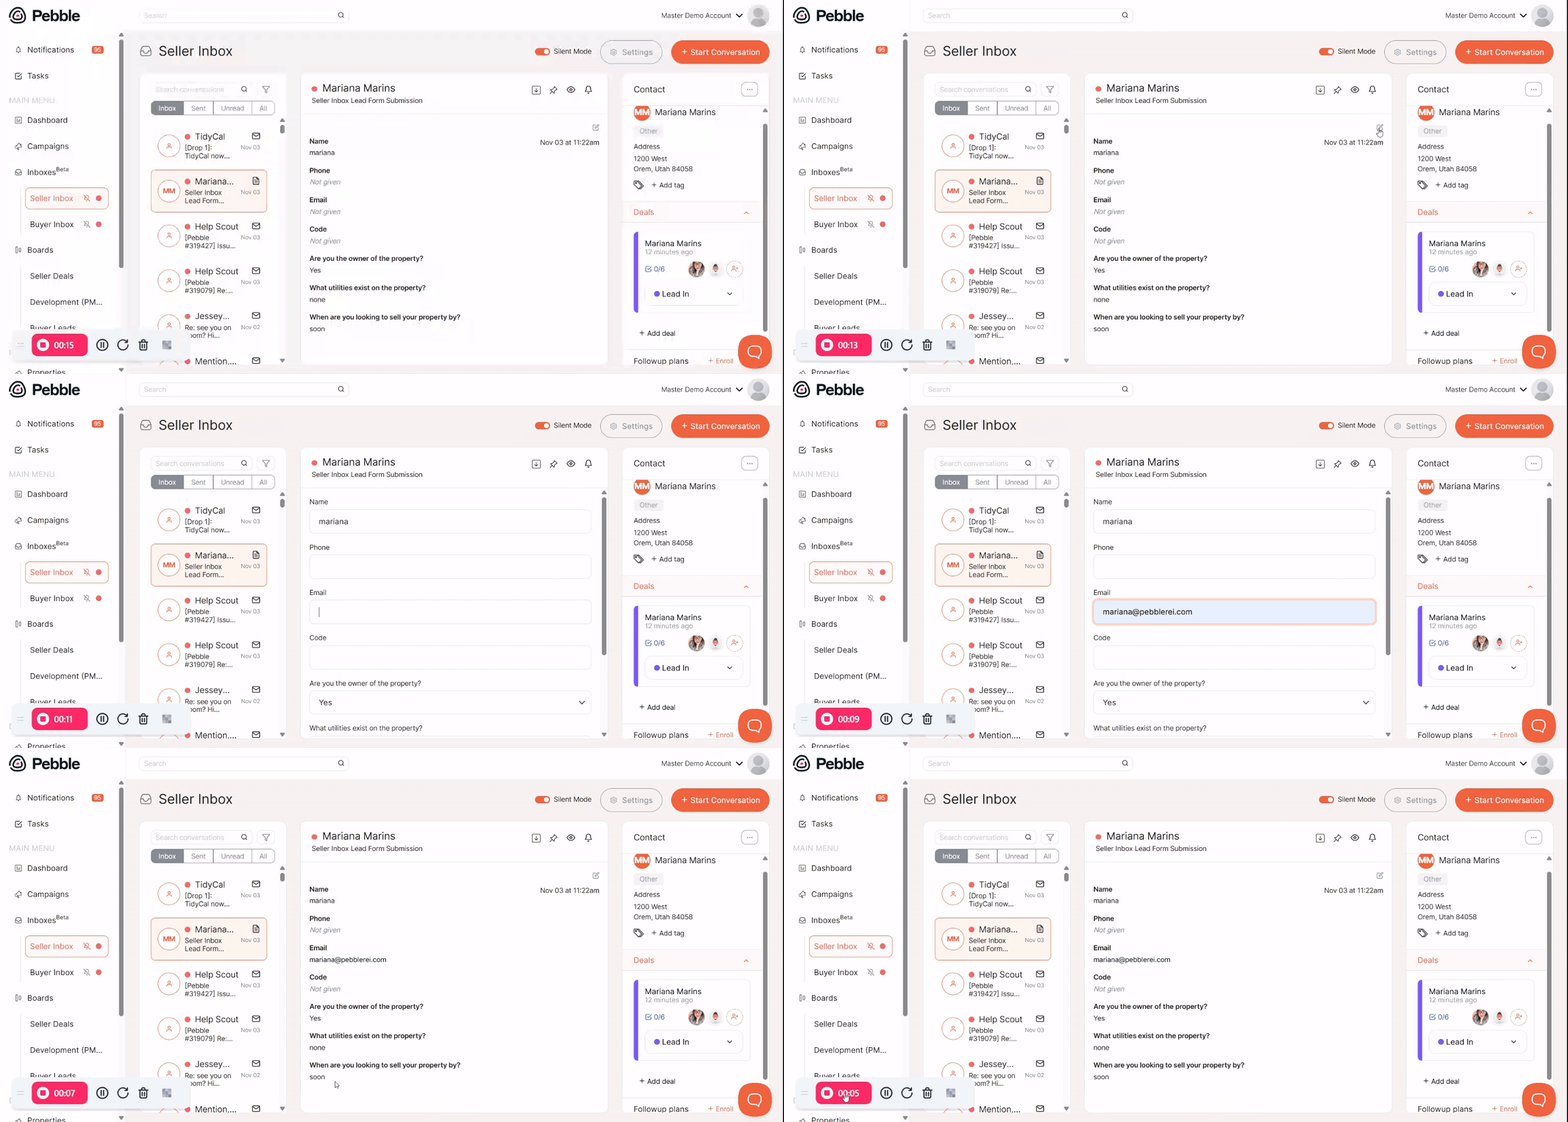
2. Create a deal
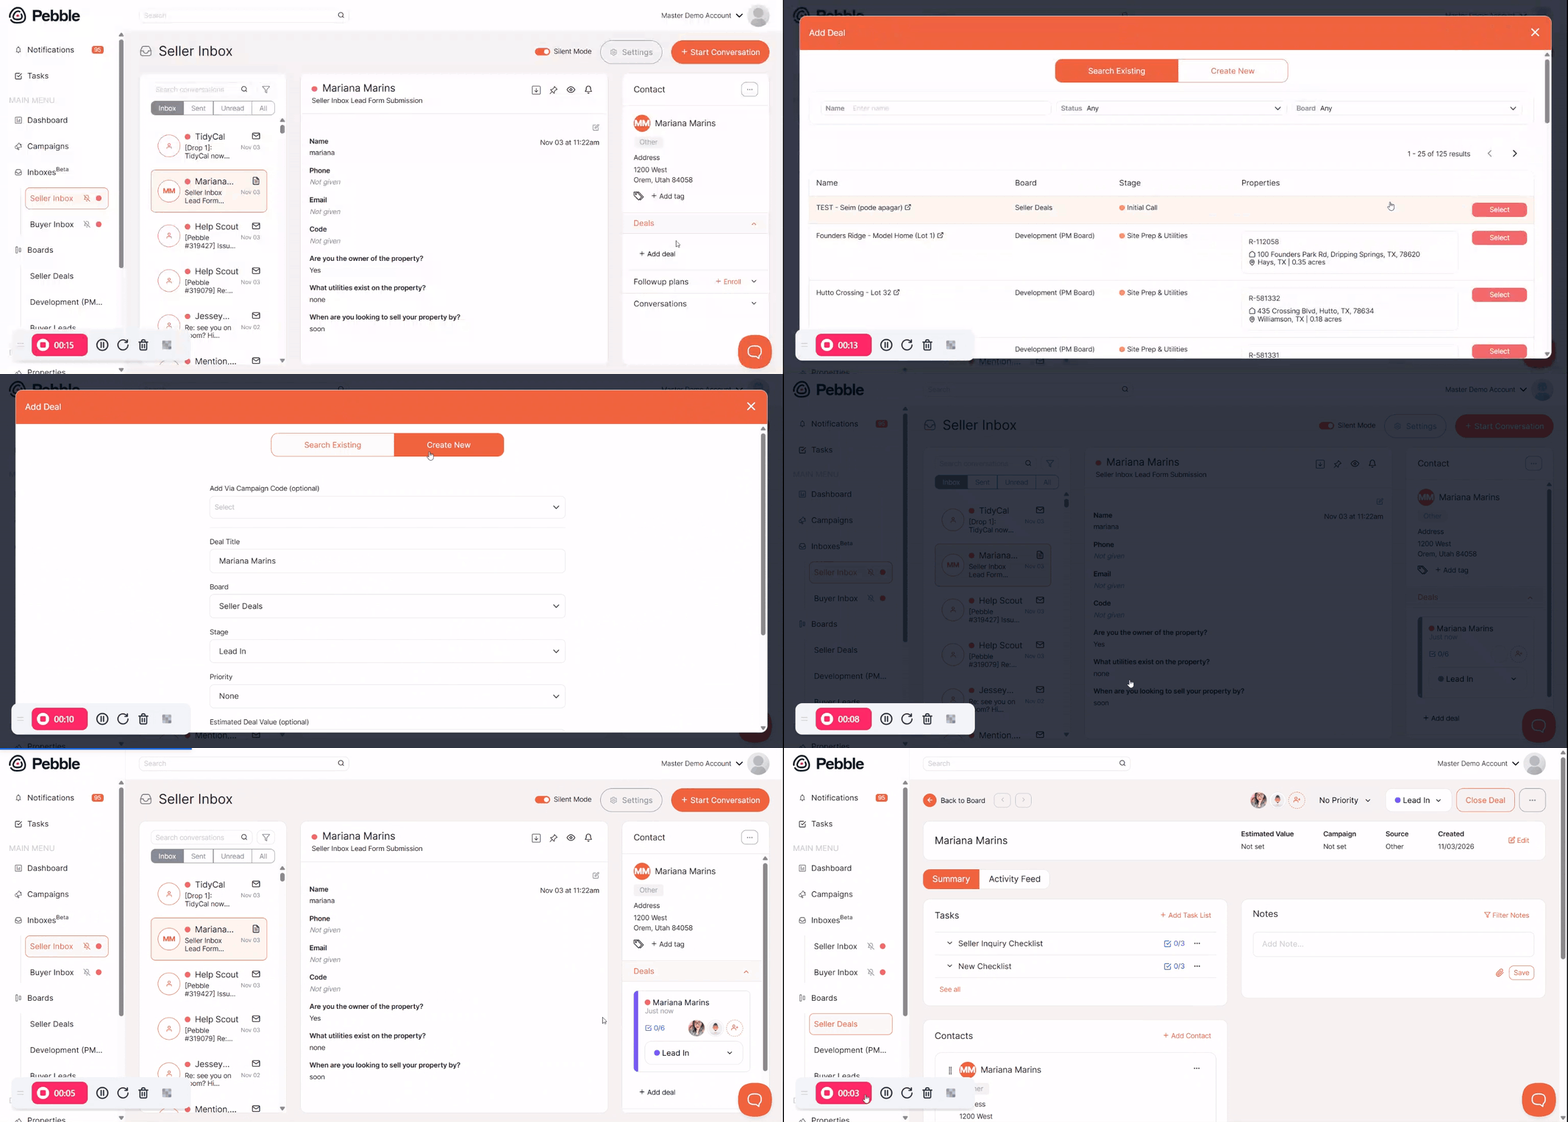
After reviewing the answers, the next step is to turn the lead into a deal. A deal is not created automatically, so create it from the same conversation:
- In the lower-right corner of the conversation, find the deals section and click Add Deal.
- A pop-up opens with two tabs: Search Existing and Create New. Click Create New.
- Choose the board and the stage, then click Save.
The deal is created with the lead's form answers already in it, so you don't have to copy anything over. It's also linked to the conversation, and you can find it on your board. For more on working with deals from the inbox, see Managing Your Inboxes.
If the lead is already a contact in Pebble, use the Search Existing tab instead to link the deal to that contact.
Adding a deal without a form submission
Not every lead comes through a form. If a lead reaches you another way (for example, someone who called you directly), you can create the deal straight from your board. Either:
- Go to the stage where you want the deal and click Add Deal in that stage, or
- Click Add Deal at the top of the page and choose the stage from the dropdown.

Need help? Email us at hello@pebblerei.com.